The Android updates are here and so is the ease. If your internet isn’t left out, learn how to change the DNS server on Android.
Android 10, known as Quince Tart, Android 11 which is referred to as Red Velvet Cake, and Android 12 known as Snow Cone, all rolled out with unique updates that gave users more control. Like the Android scoped storage beginning from Android 11, control over DNS settings was also added.

Everything connected to the internet has a unique identity. Your phone, computers, or websites all have something known as an IP address. This is how they all connect creating what we know as the internet. They are in numeric form, e.g 152.188.1.1, or alphanumeric form like 2400:cb00:2048:1::c629:d7a2.
The problem with IP addresses is that they are not easy to remember, hence Domain names like example.com are being used. The domain name is what you need to remember, but unfortunately, not what your browser needs or understands. They only work with IP addresses. This is where DNS servers come in. But first, let’s look at DNS.
What is DNS?
DNS, short for Domain Name System, is a Decentralized list of all Domain Names together with the IP address of all devices and services connected to the internet. There can be hundreds of IP addresses for a single domain. This is usually the case with big brands such as Google that offer location-based services using multiple servers.
So with DNS, you get to connect to any website using their URL or domain names instead of using their IP address. The Domain Name System (DNS) translates URLs, otherwise known as the Domain Names, into IP addresses that the browser can work with. So when you type in a domain name in the address bar of your web browser, your browser runs the entered name against a list of IP addresses to find a match for the name.
DNS Servers
There are countless numbers of IP addresses on the list. as such, hosting all on a single server will not be so efficient. Multiple requests will be going into just one server, queuing up and causing delays. That will be a lot of time wasted. Thus DNS directory is Decentralized, stored across different servers at different world locations. These servers communicate with each other, timely, to keep updated.
To quickly trace down an IP address using the entered domain name, your device makes use of what is known as a recursive DNS server to send queries to the DNS servers that hold the directory. This is faster than your device having to send requests to every DNS server one after the other until it gets positive feedback from the one with the directory where that particular domain name is listed.
The recursive DNS used by your device is usually operated by your Internet Service Provider (ISP). There are other third-party DNS providers with faster DNS services that you can use as well.
Each time you enter a domain name or URL in your browser address bar, a DNS service is used to translate it into an IP address that your browser can use to connect to the device or service in question and request data. This process which happens behind the scenes is repeated for every input.
Aside from speed, there are other reasons why you might want to change your phone’s DNS. It could be for security reasons or privacy. Avoid your online activity being tracked for the purpose of advertising.
How to change DNS server on Android
Beginning from Android 9, a system-wide DNS setting option was added. So you can easily change the DNS server on Android 10 and other newer versions as well.
- Open the Settings app.
- On the settings menu, click on Network & Internet.
- Depending on your Android version and device, there might be slight differences. On Android 10 and 11, click on Advanced or Other Wireless Connections.
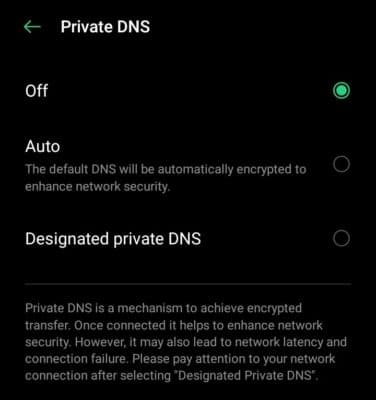
- Scroll down and then click on Private DNS.

- From the three available options, select Designated Private DNS.
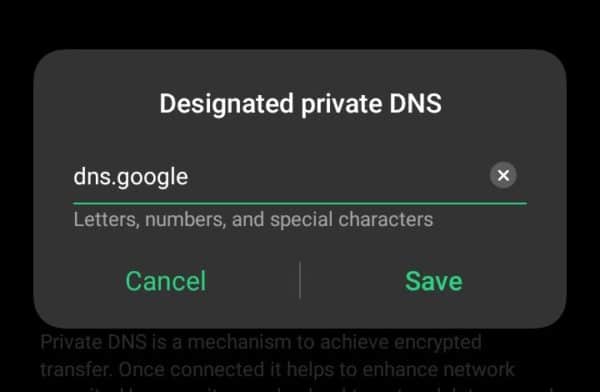
- Now click on modify and then enter the DNS server you want to use. Since Android has enforced DoT (DNS over TLS), you can only input a TLS hostname instead of the usual primary and secondary DNS addresses of the DNS server. For instance, you have to enter dns.google the TLS hostname for the Google public DNS instead of the IP 4.4.4.4 or 8.8.8.8.

- Click on Save to save the new DNS. If the hostname is correct and DNS is working, it will show connected to (the hostname).


Now you can go back to browsing as usual.
How to change DNS server on Android WiFi
You can change the DNS server on Android 12, 11, and 10 when you connect to a WiFi network.
- Open the Settings app on your mobile phone or use the shortcut button via the swipe-down notifications.
- Click on Wi-Fi in the settings menu.
- Turn ON the Wi-Fi connection.
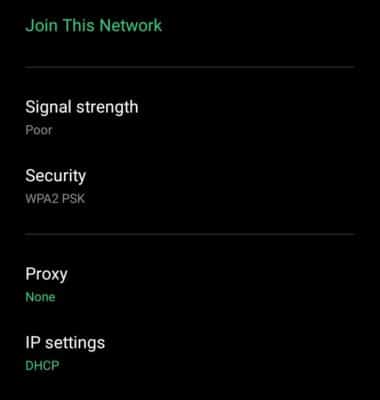
- Now, click on the information symbol, i within a circle, beside the WiFi network you want to connect to. This is to bring up the information regarding that WiFi network.

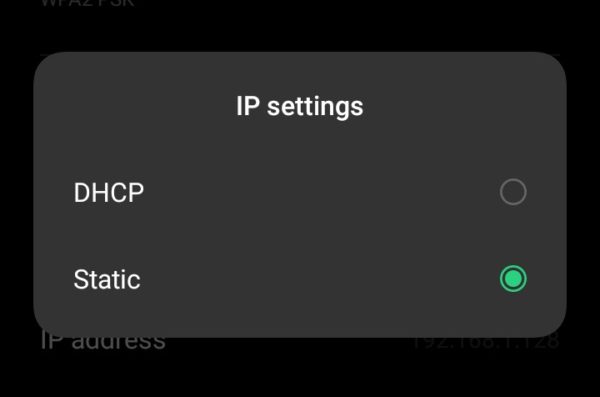
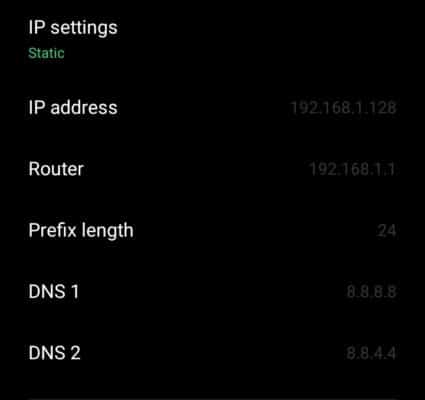
- Change IP settings from DHCP to static.

- Now enter your primary and secondary DNS in DNS 1 and DNS 2.

Change DNS server on Android FAQs
Can changing DNS make the Internet faster?
Yes, Changing DNS servers can make the internet faster. Although streaming and downloading speeds are not influenced by DNS change. After entering an address or query in your browser, how fast you get results depends on not just your network speed, but also how fast a domain name is resolved. It will take some time for the entered domain name to be checked across the list of IP addresses. A DNS server with a faster-resolving strategy can reduce the amount of time needed to do that.
What is the best DNS server for Android?
The best server depends on which one is secured and closest to you. There are many DNS servers, some with specific purposes so you need to know why you are connecting as well.
Google public DNS, OpenDNS, Cloudflare, Comodo Secure DNS, OpenNIC, and Verisign Public DNS are some popular choices.
Final thoughts
DNS was not built secure from the start. As such hackers have utilized this vulnerability in many ways. Although steps have been taken to make the service more secure as the day goes by, you still need to take steps to protect yourself. Avoid suspicious DNS servers.
