In recent months, many have been talking to us about Nikon Capture NX2, an application that is usually included (at least a trial version) with the purchase of a Nikon camera.
We have dedicated a large number of articles in various editing programs, highlighting, of course, Lightroom and Photoshop above others (in fact, everyone has a unique category within the blog).
So I set out to install the Nikon Capture NX2 application and write a little about it. Do you want to know this application and some of its possibilities to edit your photos? Well, don’t miss this article…
The interface- the 4 sections of the application
When you log into Nikon Capture NX2 you find an interface in which there are 4 clearly differentiated sections.
- On the left side, there are panels for accessing information about the location of the images, the metadata of the photographs, and the cataloging information.
- At the top right are the icons for quick access to the functions that allow– scroll the image, zoom in/out, rotate, crop, select the white, middle and black point, correct red eyes, the automatic adjustment, make selections, etc.
- The central panel shows the image, which can be enlarged or reduced depending on the degree of detail you want to observe.
- In the right section, you can access the editing information. Which is divided into Camera Settings, Quick Settings, Lens and Camera Corrections, and Settings.
Let’s look at the different sections in more detail so that you can see everything you can do with this application.
The left panel- classification, metadata, and location
As I said earlier, the left area of the screen is intended to present the user with information about the physical location of the images.
At the top of the screenshot, you can see the ability to filter images based on numbering or color (0-9) and number of stars. In addition to varying the order of them according to different criteria.
In the “Metadata” palette you can see the possibility to access the information of each image. Being able to define keywords, tags, ratings, review EXIF data, etc.
Finally, within the “Explorer” palette, you will be able to access all the images that are in the folder you are viewing at any given moment and that satisfy the filters set.
The top panel- quick access features
The panel at the top right of the application interface allows us to access important features via simple icons. In order from left to right, these functions are as follows:
- Direct selection tool.
- Hand (to move around the image).
- Enlarge.
- Rotation.
- Straightening Tool.
- Cut out.
- Black control point (adjusts the exposure based on the deepest shadows).
- Neutral gray control point.
- White control point (adjusts the exposure based on highlights).
- Spot Color Control Tool (lets you vary the hue of a selected region.
- Red-eye correction tool.
- Automatic adjustment brush.
- Punctual selection.
- Lasso selection.
- Selection brush.
- Selection gradient.
The functioning of these tools does not hide any mystery, as they are also present in many other editing applications.
It simply highlights the point control tools, which will allow, given a point, to select adjacent regions of similar hue (the size of these regions is user-defined) and get very good results with minimal effort in the selection process.
If you’ve had a chance to test HDR Effex Pro 2 (even from the developers themselves) for creating HDR photographs, you may be used to this type of setting.
The right panel- the great retouching tools
On the right side of the Nikon Capture NX2 interface are the main editing features of the application.
This panel initially has a section that allows you to zoom in and see the part of the image represented at any time.
Below are three groups of general settings- Camera Settings (1), Quick Settings (2), Camera and Lens Corrections (3).
- The first group allows you to work on white balance and noise reduction and focus level. And also with Nikon’s setting called D-Lighting.
- Within the Quick Settings, it is possible to work at the level of curves and levels, definition of contrast, shadows, and highlights.
- The last of the groups allows you to correct chromatic and geometric aberrations, define vignetting, and so on.
The next section is the Settings section, which will automatically include the settings you made, so you can always go back to a previous setting and even change their properties. It is similar to the “History” section normally offered by many applications.
Finally, a histogram showing the distribution of highlights and shadows in the image will always be displayed at the bottom right.
Local Settings – a great trick from the right panel
In the right panel, at the bottom, there is a button identified as “Next Step” that will allow you to apply the adjustments to the image. Nothing new so far. And these settings will be incorporated into the Settings section as new steps in the Settings section.
The good thing about this “Next Step” feature is that once you select this option and determine the setting you want to apply (light, color, focus, noise, effect application, etc.) the application will allow you to apply it to the entire image or use the different selection tools we mentioned initially- lasso, point, gradient…
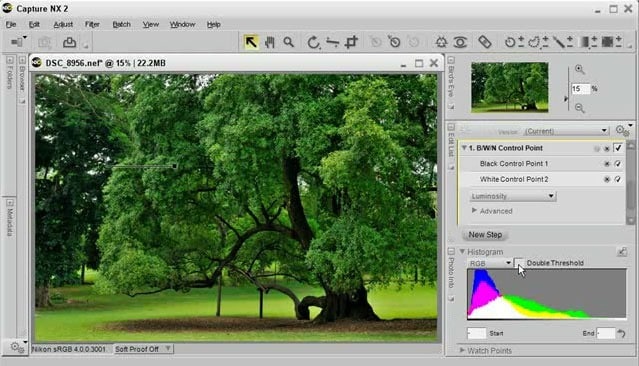
In the image above you can see a Levels and Curves type adjustment that was applied using a point type selection on the channel water. A green mask is shown in the image, indicating the region affected by the selection.
With this option, the adjustments can be very localized and the results you get will be amazing and very precise. Allowing, in a simple way, to make a perfect adjustment by zone.
My opinion on Nikon Capture NX2
With the points described so far, we would have described the basic operation of the application. Of course, you can always dig a little deeper and discover some hidden gems. But as I said, this is, in essence, Nikon Capture NX2.
If you ask me for my opinion, I will tell you that it is a simple and powerful application whose only advantage for those who own a Nikon is that, by default, it allows you to obtain greater initial fidelity with the image you have captured with your camera compared to generic apps like Lightroom (Nothing you don’t end up getting with the correct settings in other apps).
In addition to this obvious advantage, it should also be noted that the adjustments that are made are not destructive, so it is always possible to recover the initial image or return to an intermediate state through the entries that are recorded in the Adjustments section.
Finally, I have to mention again the spot control selection tools, which offer excellent results practically automatically, avoiding the photographer having to spend too much time making the selection.
Aside from these advantages, I think it’s a far inferior application to Lightroom in terms of ease of use, location of controls, manageability, functionality, cataloging and printing options, etc.
However, I have personally been working with Lightroom for a long time and I may have gotten so used to working with this application that it is difficult for me to switch to another. Although I honestly think I am quite objective in putting Nikon Capture NX2 a notch below.
What do those who have tested it more thoroughly say?
I was only able to dedicate a couple of afternoons to the application, so it can be said that I am a true rookie. Although I didn’t want to miss the opportunity to give my opinion on the matter.
Maybe you have been using it for longer and you disagree with me, or maybe you do. In any case, tell us why you agree or disagree with me, find out which features of Nikon Capture NX2 should envy those of us who use other applications, and why try it as a retouching tool within our stream.
