Do you want to create a MacOS Mojave stick but do not know how? Did a friend suggest you always have a bootable operating system support at hand so that you always have a Swiss army knife in case of an emergency? macOS 10.14 is Apple’s latest revolution for its Macs and if you have already downloaded the update in your computer you just have to make a Mojave bootable pen drive that can be useful on several occasions.
Apple no longer sells DVDs and USB sticks of its operating systems as in the past, but the distribution takes place exclusively online through the Mac App Store, allowing all users with a supported Mac to download the latest version of the free operating system and in a few minutes.
But what if you want to put macOS 10.14 on USB to get bootable support on any Mac or if you plan to format and install the operating system from scratch?
macOS Mojave 10.14 on USB stick- how to do?
No need to be a programmer or computer expert to create a bootable Mojave media, in this guide you should find everything you need to create your Mac OS 10.14 key so you can use it on any computer or store it for emergency situations where your Mac does not start, you need an external bootable media or you need to repair the Mac boot.
What is MacOS Mojave on USB for?
As already mentioned in the introduction of the guide, having an operating system in a bootable USB media can be useful on multiple occasions and in particular:
- if you decided to do a clean installation of macOS Mojave
- you want to install the operating system on a supported Mac but that does not have an internet connection
- you have to format your Mac and reinstall an earlier version of macOS (downgrade)
- you need emergency support to repair your Mac or disk if it does not work
Considering that to create a bootable support takes very little time and easy to find tools, I always recommend to create the key with your operating system and to keep it for any need.
Necessary material
To create the MacOS Mojave USB stick you will need to have the following technical requirements:
- fast and unlimited internet connection
- Mac computer compatible with Mojave
- MacOS Mojave 10.14 installation file
- 16GB USB stick
Create bootable USB of macOS Mojave
If you have all the requirements listed in the previous paragraph and you know how to download macOS 10.14 you can safely proceed with the creation of the installation media on USB. You will not have to download programs or use paid tools, just follow the instructions below to create the Mojave stick in a few minutes.
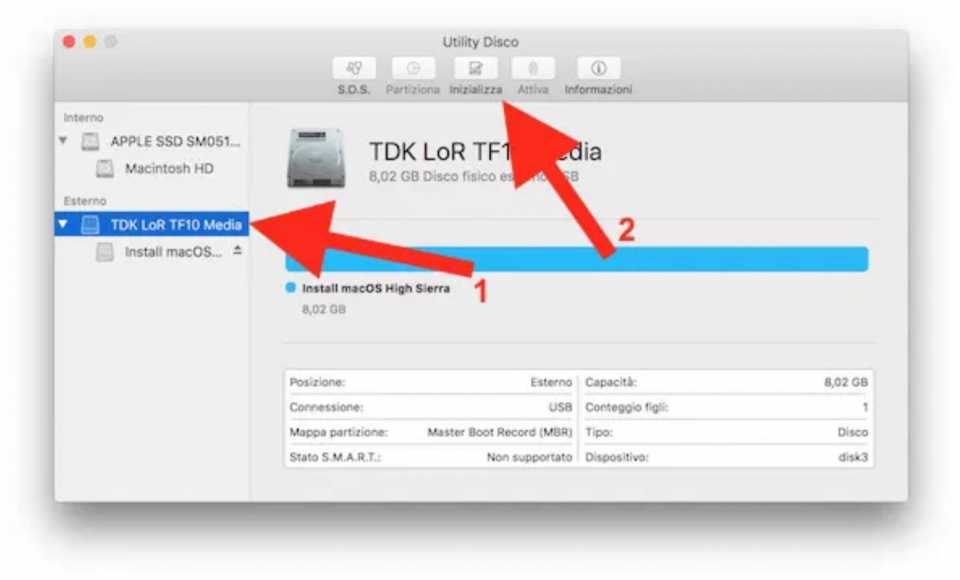
Insert the 16GB USB media into your Mac and open Disk Utility in the Applications> Utilities folder. At this point, select the key from the sidebar on the left and then click on Initialize up. This procedure will erase all data on the stick and then back up the data.
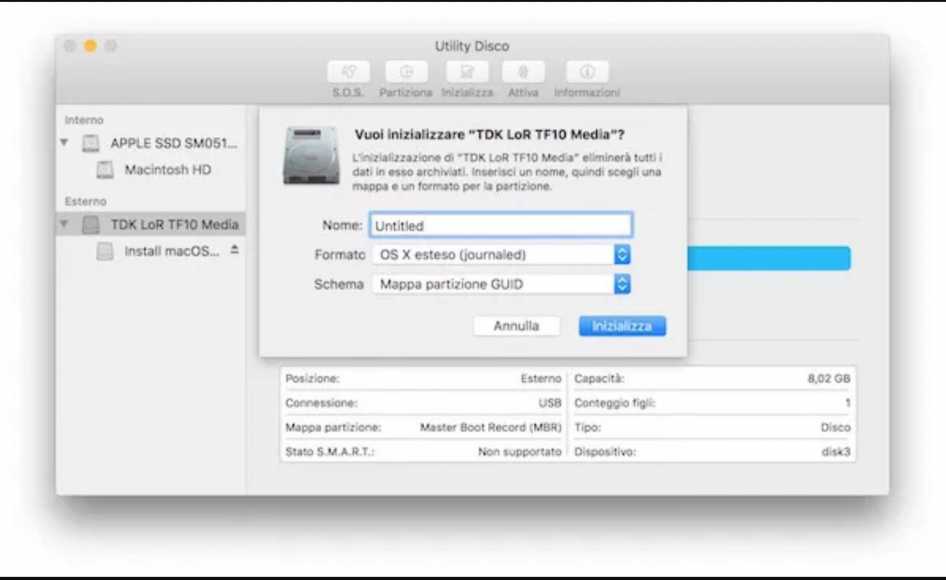
When prompted, type the name Untitled to name the USB stick after formatting and make sure that the bottom of the OS X is extended (Journaled) next to Format and Map GUID partition next to Schema- confirm the formatting by clicking on Initialize and accept any requests. This procedure could take a few minutes, at the end click on Finish.
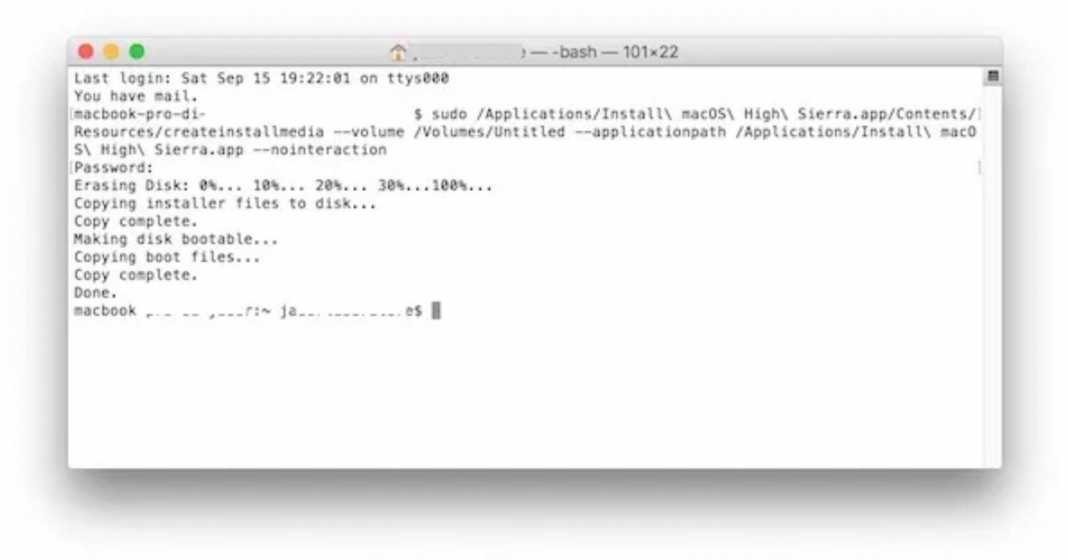
Now let’s move on to the MacOS Mojave USB stick, then insert the formatted media into the Mac where you downloaded the MacOS Mojave installation file, open the Applications> Utilities folder and launch Terminal.
Copy and paste the following command that tells the operating system to create a bootable installation media in the Untitled volume:
sudo / Applications / Install \ macOS \ Mojave.app/Contents/Resources/createinstallmedia -volume / Volumes / Untitled -applicationpath / Applications / Install \ macOS \ Mojave.app -nointeraction
When prompted enter the system administrator password, respecting any uppercase / lowercase characters and symbols and press Enter to confirm- type the password even if no asterisks or other symbols appear as you type. The command will format the key and copy the files of Mac OS 10.14 to become a bootable media.
Ignore any error:
” WARNING:” -applicationpath “is now deprecated. “
The completion of the procedure can take more than 30 minutes, wait without removing the key and do not turn off the computer- to confirm the finalization of the operation will appear in the Terminal Done- you have finally created a USB support MacOS Mojave.
How to install macOS Mojave from USB pen
If everything went right and you followed the steps suggested in the previous paragraph, now you have a bootable USB MacOS Mojave support. With this USB stick, you can install the update on any Mac computer supported by the new operating system even if an internet connection will not be available or you can use it to do a zero installation of Mojave so as to minimize the appearance of any bugs due to file of the previous version.
To start the Mac from a stick, simply- turn off the Mac, plug in the USB stick and turn on the computer by holding the Alt key on the keyboard. After a few moments, you will see a screen appear asking you how to start the computer- from the hard disk (operating system already installed) or from the USB stick. Obviously, you will have to make the second choice and you just follow what appears on the screen to perform an update, install macOS from scratch or use the recovery utilities.

How or where do I download MacOs 10.14 Mojave??
I suppose it would be on my Macbook Pro somewhere, since I’m already running Mojave on this very laptop. But I want to reinstall it from scratch. I understand the described steps but I just don’t know how to actually download Mojave?