This post is a basic guide to start using this fantastic program, useful for studying any type of topic. It is not difficult to use, only that some options are unclear to beginners.
Anki is an SRS (Space Repetition Software) program which, depending on how well you know the answer, automatically adjusts the appearance of a specific question after a while. The more a notion is repeated at regular intervals, the more one can remember it and will hardly forget it.
The program is presented on different platforms, including iOS and Android, so you can also study outside the home at any time of the day.
How repetitions work
Before you start composing your cards, try to download a ready-made test deck to test how it works. Click on the button below “Get shared decks“- a web page will open from which you can choose the deck you prefer. Click on the title of the deck you have chosen and download it.
You may have noticed that in the main Anki screen there are two other buttons at the bottom- “Create deck” I don’t think it needs explanations, while the other “Import file” allows you to import files into Anki to transform them into decks, such as for example i files created automatically by programs like subs2srs.
After downloading the deck it will appear on the program screen. Open it and start the repetitions by clicking on the “Study now” button.
Look carefully at what the question asks and finally click on a show the answer- on the back of the card there may be the translation of the sentence and other additional notes, it depends on the deck you have chosen. It is also possible to have cards with an answer.
You know the card in front of you well, do you understand what the phrase means? Then click on easy and the card will show up in a little while. Are you unable to read it, do you not understand the meaning or do you not remember a few words? Click on repeat if you want to review it again as soon as possible (by default it is 10 minutes, you can change the time between the study options), or on difficult to review it in a few days.
Depending on how much you understand the sentence, you decide whether to define it difficult or normal, I usually use it difficult when I don’t remember almost all the words. I don’t use it so often repeat instead, having too many cards to do every day I would have a very high number of cards to repeat every time.
The easy answer must be reserved for those cards that are understood on the fly 100% without hesitation. All the cards that have been replied “repeat” are considered as failed, automatically after 8 times the program suspends them and they are no longer shown during the repetitions.
To speed up the reviews with Anki learn the quick commands- space bar to see the answer and the numbers 1 to 4 to answer the question (1 = repeat up to 4 = easy).
Here is what the repetition screen looks like with the explanation of each command (click to enlarge):
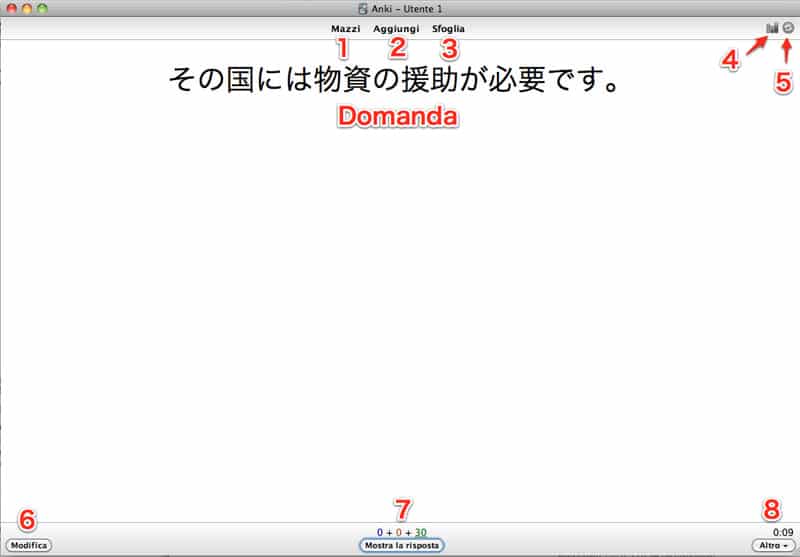
- Bouquets: return to the main screen of the program
- Add: allows you to add new cards to the deck
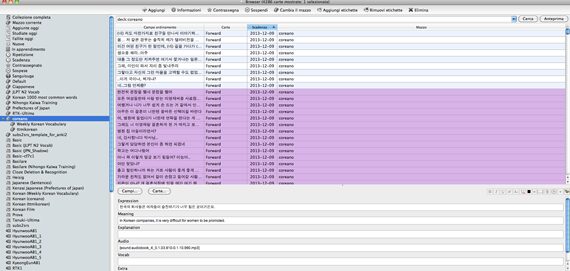
- Browse: Check here all Anki cards and decks, divided by labels, marked cards, and other categories. From here you can delete the cards that do not interest you or modify them.
- Statistics: shows the statistics of your repetitions (how many times you have pinned exactly or wrong) and a prediction of how many cards you will have to repeat in the future
- Synchronize: synchronize the deck with the Anki Web service
- Edit: edit the current card
- Remaining cards: you can see the number of cards remaining for the review- the purple number indicates the failed cards, the green one the cards to repeat, the blue one the new cards.
- Other: here you can find other options such as repeating the card audio or canceling the card. Above the button, you will also find the answer timer, i.e. how much time passes before giving the answer.
Aside from a few commands that are quite clear, and I don’t think they need explanations, there are some more difficult to understand:
Bury note: The card is hidden from repetition until Anki is restarted again. Useful if you want to return to that card later.
Tag note: Highlight the card, useful if you want to remember to modify it or highlight it for some other reason. In this way you can easily find the card while you are leafing through it- it will be marked by a purple color on the “Browse “.
Options: From here you can change the deck settings. I believe that the only options that you will find useful to modify are in the first “New cards” tab, to set the limit of new cards that appear every day, in the “Errors” tab (you decide what to do with the failed cards), and in “General “.
How to use labels to improve your study
I mentioned earlier that each card can be assigned a different label. How do they work? They are used to organize the cards and are very useful for suspending cards with topics that you haven’t studied yet. If you are a beginner you will not want to meet cards addressed to those of advanced level, right? Let’s see how labels can help us.
Let’s say that you have downloaded a shared deck, divided into beginner, intermediate and advanced labels. Instead of making three different decks for each level, the author decided to make a single deck and assign each card its label according to the level of the phrases, words, etc. However, we want to suspend the cards with the labels that do not interest us.
From the “Browse” screen, just click on the label you want to suspend (on the left down, they have the bookmark icon), select all the cards (click on a card and Ctrl / Cmd + A) and finally click on Pause. Repeat the operation for all the labels you want to suspend.
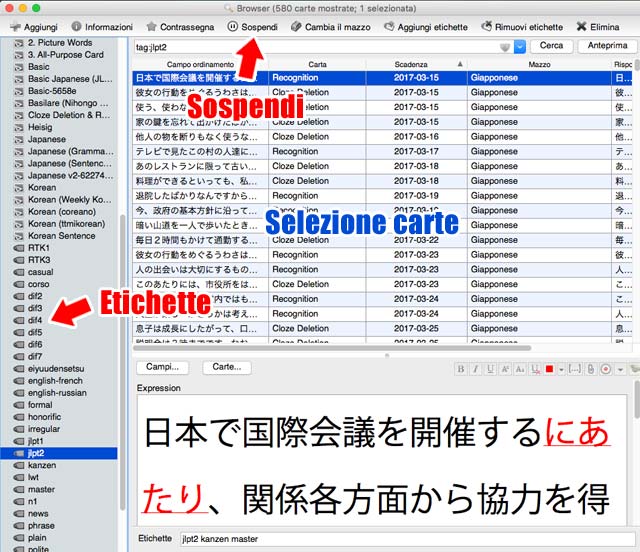
If you have performed the suspension correctly, all the cards you have suspended will be highlighted in yellow on the “Browse” screen (note- in the image above, no suspension has been implemented and only one card has been selected). If one day you want to remove this block from the suspended cards, all you need to do is the exact same process.
You can do the same process with cards created from scratch, just remember to assign a label to each card. For example, you could indicate the source from which the sentence was taken, the level of difficulty, the chapter of the book from which you took the sentence, the topic, the category and so on. You can assign multiple labels.
Personalized study
In the screen dedicated to every single deck, together with the Options button, you will find “Custom study“. From here you can decide to personalize your studio even more, such as adding additional cards to be reviewed or new during the day, repeating in advance the cards that will occur the next day, repeating old cards or cards that have a specific label or status.
These latter options are very useful when you want to review only certain types of cards to prepare for an exam.
Set program preferences
To change the program preferences go to Settings> Preferences (for Windows) or Anki> Preferences (on Mac).
Basic: I don’t think these options need a lot of explanation. I advise you to remove the check mark for “show the next answer deadline“. In this way, you no longer see when that card reappears- it is very easy to fall into the trap of answering “difficult” questions just to see them more often, so you are forced to answer each card sincerely without being conditioned by the deadline.
The option “The next day starts X hours after midnight” is used to indicate when you want the day for Anki to start. Basically it starts at 9 pm, change it if you think it is necessary that within that hour you will not be able to do the daily repetitions.
You can also set how long to last a study session, useful for programming how long your repetitions will last with Anki, the program will notify you of the designated deadline.
Profile password can be useful to set if multiple people use Anki with different profiles. If you are the only one using Anki on your computer I don’t think you will need it.
Network: to set the deck synchronization options with Anki Web. It is highly recommended to make a free account with the web version of Anki and insert the username and password in these options.
Anki Web allows you to save all your decks in the cloud. In this way, whether you use the program on your PC or on a mobile phone, the decks will always be synchronized and you can resume the session at any time when you left it. Comfortable, right? So you can take advantage of using Anki even when you only have 5 minutes of free time.
Backup: I don’t think I’ve ever changed the default settings, it just automatically saves every card. Better to keep these saving options active, if by chance the program suddenly crashes you don’t have to start the reviews again.
Once you have changed the settings, restart Anki to make them active, some options only take effect after the restart.
Take advantage of add-ons
As if Anki was not already complete enough, there are plenty of add-ons to add more features to the program– to install new ones go to Tools> Add-on> Browse and install…
Follow the instructions indicated in the window, browse and search for what seems useful to you for the language you are studying and install it. For example, for those who study Japanese, “Japanese Support” is very useful for furiganas on words and for kanji statistics if you do not have the sound of the cards “Google TTS” or “Awesome TTS” it can be an add-on useful for hearing the pronunciation of words.
Look for those that seem useful to you for studying, they can help you create excellent cards!
With this guide, you have learned how to set up the program and perform the repetitions.
If you have any questions, leave a comment!
For more info, you can watch the introductory videos of the program and the manual.
