Welcome to today’s tutorial. I shall be continuing from our last tutorial on how to take a screenshot on a PC; but for today, I’ll be focusing on the Mac OS – as we’ve already looked at How to take a screenshot on a Windows PC – Part 1.

To take a screenshot on your Mac OS device is just as or even easier than with Windows OS. You can do this using any of the three methods below.
How to do screenshot on Mac computer (For the Mac OS users)
Method 1:
- Step 1: Make sure that you have the screen as you’d want it when captured.
- Step 2: Press the key combination “Command + Shift + 3” to take a screenshot of the screen.
- Step 3: Locate the screenshot you just took on your desktop. It should be labeled with the date and time that it was captured.
Method 2:
This method is useful if you wish to screenshot a particular area of your screen and not the entire screen.
- Step 1: Press the key combination “Command + Shift + 4”. The pointer should then change into a crosshair.
- Step 2: Click and drag the crosshair to select the area of the screen you wish to screenshot.
- Step 3 – Release the mouse button; you should hear a camera shutter sound (if your computer sound is turned on) to indicate the screenshot.
- Step 4 – Locate the captured image on your desktop as in the first method.
Method 3 – Using the Grab utility tool
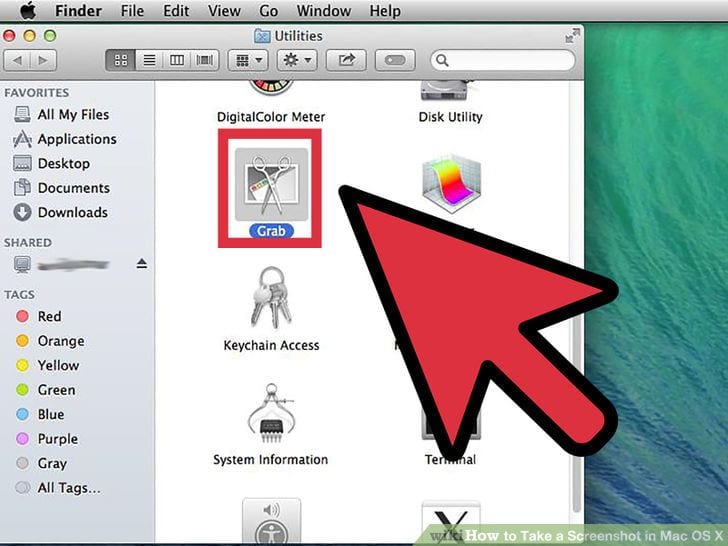
This method involves the use of a program that comes with the Mac OS called Grab. To use Grab, follow these steps:
- Step 1: Go to Applications>Utilities>double click on Grab to launch it
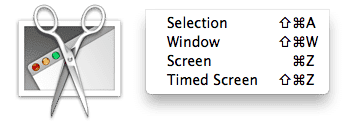
- Step 2: Select any of the screenshot options under the Capture menu to start a screenshot.
- Screen (to screenshot the entire screen)
- Window (to screenshot a specific window)
- Selection (to capture a portion of the screen)
- Timed Screen(capture the screen with a timer)
- Step 3: Click and drag the mouse (after selecting an option from step 3 above) over the area you wish to capture. If you selected the Screen option, you cannot be able to crop the image before capturing.
- Step 4: Save the screenshot by clicking on the Save option under the File menu.
That completes the series on “how to take a screenshot on your PC”. If I missed anything or did it wrongly, please do let me know.
Thanks.
