AirDrop is a feature on iOS and macOS devices which lets you share files on your macOS and iOS with other Apple devices nearby wirelessly. Irrespective of the device, as long as its running iOS or macOS, you can access AirDrop on it. In this guide, we will be going through how to use AirDrop on Apple iPhone, iPad, or iPod touch.
SEE ALSO: How to Turn Off the “Tap to Wake” Feature on the iPhone X

How To Use AirDrop on Apple iPhone, iPad, or iPod touch
You can use AirDrop to send content from apps like Photos, Safari, Contacts and other apps.
How To Share Content with AirDrop on Apple iPhone, iPad, or iPod touch
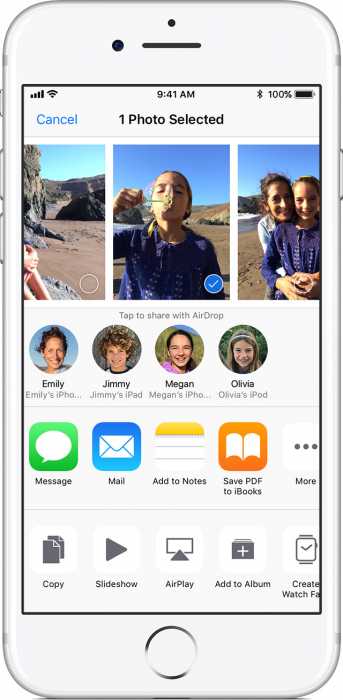
- Go to any app on your Apple iPhone, iPad, or iPod touch you wish to send content from and then navigate to the item you wish to send. If you want to share more than one item instead, tap Select and then tap on the items you want to send.
- Next, tap on the “Share” button or the upload icon (the icon with an arrow going upwards from a box.”
- Tap on the AirDrop user you wish to share the item(s) with.
How To Receive Content Using AirDrop on Apple iPhone, iPad, or iPod touch.
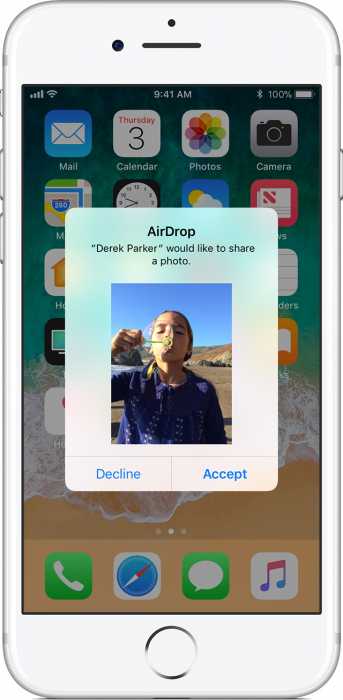
Whenever someone wants to share content with you using AirDrop, you will see a prompt on your screen with a preview of the content that wants to be shared. There, you can either tap on “Accept” or “Decline.”
If you choose to accept, you will get the content in the app it was sent from. For instance, you will get photos in the Photos app.
How To Edit AirDrop Receiving Options on Apple iPhone, iPad, or iPod touch

To set your AirDrop Receiving options, follow the steps below.
- Open the Settings app.
- Tap on the General option and then tap on “AirDrop.” Here you can choose who can see your device, and also send you content. You can also set the receiving options from the Control Centre. Follow the steps below to do that.
- On any page on your Apple iPhone, iPad, or iPod touch, swipe upwards from the bottom of the screen to open the Control Center.
- Next, tap and hold the network settings card in the top left corner of your screen.
- Now, simply choose from any of the options below to set your AirDrop receiving options.
- Receiving Off – No one will be able to send you AirDrop requests.
- Contacts Only – Only your contacts will be able to send you AirDrop requests.
- Everyone – All nearby iOS using AirDrop will be able to send you AirDrop requests.
If you can’t see the other device in AirDrop
If you can’t see the person or the device that you’re trying to AirDrop to, check the following:
- Check that both of you have Wi-Fi and Bluetooth turned on. If either of you have Personal Hotspot on, turn it off.
- Make sure that the person you’re sending to is nearby. You can’t AirDrop to users who are out of Bluetooth and Wi-Fi range.
- If the other person’s AirDrop receiving setting is set to Contacts Only, and you’re not in their Contacts, have them set their AirDrop receiving setting to Everyone.
If you tried choosing the Receiving Off option and you’re not able to change it, go to the Settings app on your iPhone and then tap on General. Tap on Restrictions and then toggle the switch beside AirDrop to turn it on.

Is airdrop a good place to protect and save pictures?