While working on the computer, perhaps with very heavy programs, it may happen to run into an error concerning the RAM memory. Care must be taken, as such an error could lead to a crash and thus loss of work. In fact, the execution of Windows 10 programs occurs through the main memory (RAM) and virtual memory (which “simulates” a memory space greater than the real one). When the main memory runs out, the PC starts using virtual memory, which already causes a noticeable slowdown of the car. If, in extreme cases, virtual memory also runs out, then the low memory error message appears. For this reason, it is good practice to know how to intervene to solve this type of problem and continue to use the PC normally.
Check running programs
The first thing to do when this type of problem occurs is to check what programs are running on your PC. To do this:
- Right-click on Start
- Continue on Activity Management
- In the screen that opens, click on Memory in order to sort the programs according to the main memory consumption
- Identify those that have a high consumption and that are not essential and close them by clicking on End activity
Change the size of the desktop heap
Another solution, also proposed by Microsoft support itself, concerns the modification of the size of the desktop heap (which, due to its limitation, sometimes leads to memory problems).
- Press the Win + R key combination
- Type the Regedit command in the appropriate bar and press Enter
- Inside the side section on the left, locate the HKEY_LOCAL_MACHINE entry and expand it
- Go to SYSTEM> CurrentControlSet> Control> Session Manager> SubSystems
- Inside the screen click with the right mouse button on Windows and click on Edit
- Inside the Value data box, locate the word SharedSection (which is followed by three values)
- Change the second value to 12288 (for 32-bit systems) or 20480 (for 64-bit systems)
- Click OK and restart your PC
Increase virtual memory
A possible solution, albeit temporary, is to increase virtual memory. The virtual memory is still slower than the main one, and will not allow you to perform your work on the PC in an ideal way. However, it can at least help you to use your PC while waiting to replace the main memory.
- Open File Explorer (click on the yellow folder icon
- Right-click on This PC, then click Properties
- Within the side screen on the left, click on Advanced system settings
- Within the Performance section, click on Settings
- Within the Performance Options screen, click Change
- Uncheck Automatically manage paging file size for all drives
- Then select the Custom Size option
Our advice is to adjust the size according to the RAM memory you have available, in such a way as to speed up the PC without making it unstable (as could happen when you increase the virtual memory size too much).
Let’s take a 4GB RAM memory as an example. In this case, we recommend that you set the initial size to 4GB, while the maximum size is 8GB. Remember that the size to be entered will be in MB– in this case, you will therefore have to enter the minimum size 4000MB, while the maximum size 8000MB.
Replace the RAM memory
If you notice that you need more RAM to perform operations on your computer, then you will need to replace it. Being a very delicate and important operation, you will have to understand how to replace the RAM memory and which one to buy. On the market, in fact, there are numerous types and models of memory to be inserted inside a PC. The first step, therefore, is to understand which memory we now have available, in order to carefully choose the next purchase.
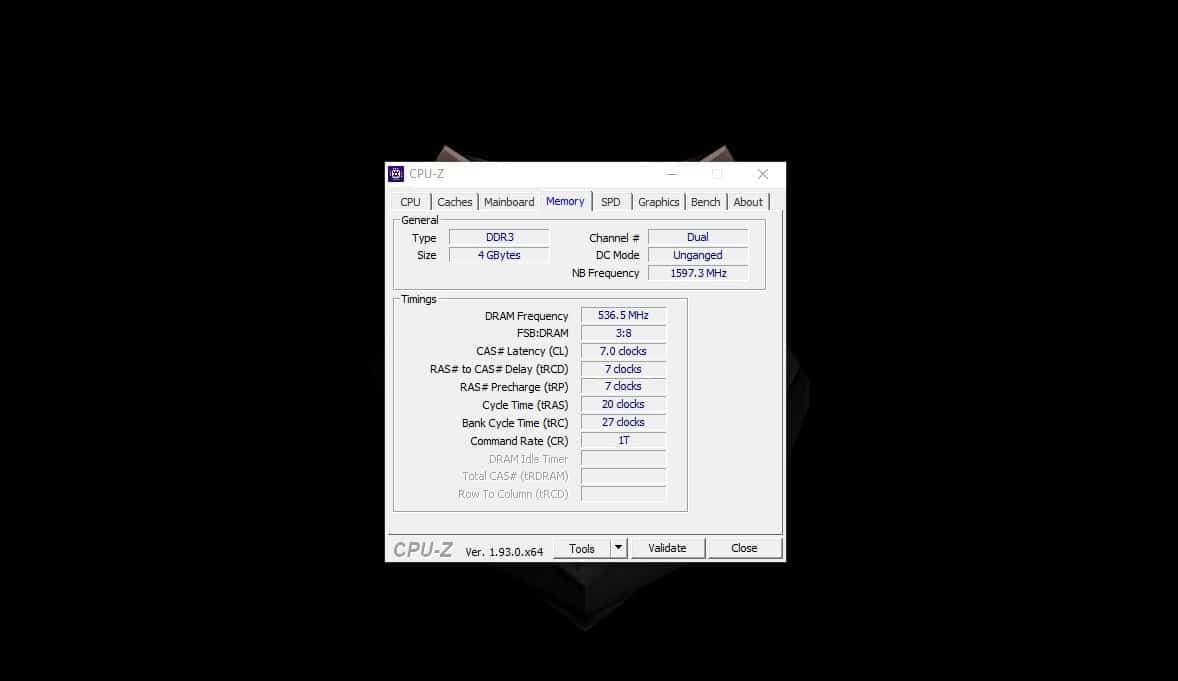
To get all the specifications on your PC and in particular on the RAM memory we recommend the use of CPU-Z, an excellent software that will show you in detail all the components and their characteristics. Only in this way will you be able to replace the RAM and thus obtain a performing computer suitable for your needs.
- Then go to the official website dedicated to CPU-Z download
- Scroll down the page until you notice the various download options
- Then click on Setup – English (or ZIP – English) and wait for the software download
- Open the file you just downloaded and follow the installation wizard
- Once the program is installed, start it
- To check the type of memory installed inside the PC and its size, go to the Memory tab
