
Knowing how to Stop AdSense Auto Ads from showing on specific pages can be the key to a steady revenue on your site. Start by following the steps in this guide.
About Google Adsense Auto Ads
Introduced in early 2018, Auto Ads is Google Adsense own way of simplifying the monetization process for websites. Auto Ads was launched to generate more revenue from ads. It does this by automatically scanning the website and with the aid of machine learning, determining the highest engagement potential places to place ads and also when to show the ads.
![]()
Using Auto Ads is easy, a unit code gets placed across all pages on your website, and through this code, AdSense can optimize the ads on your site according to set preferences.
How to stop Auto Ads on specific pages
Auto Ads also has a page exclusion list feature that lists out URLs where AdSense Auto Ads are not wanted
To Add a page Auto Ads exclusion list
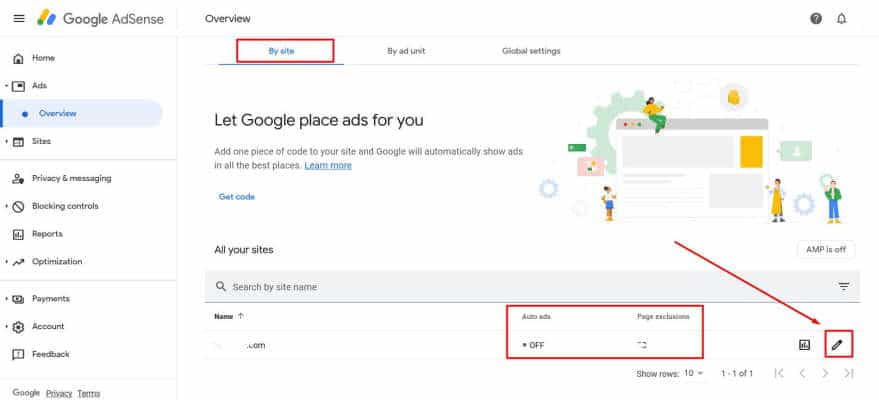
- After signing in, from the dashboard, click on Ads and then go to Overview.
- On the list of sites on the Adsense account, click on the edit button beside the site you want to add page exclusion on.
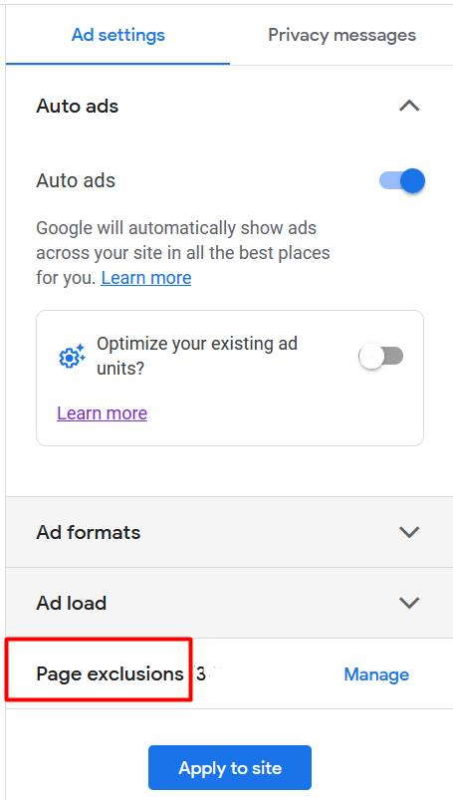
- Navigate to and click on Manage on the Page exclusions section to add and manage page exclusions from the right sidebar. Or click +Add exclusion if you already have a list of excluded pages.
- Now choose how you want Auto Ads exclusion to be applied on the URL. To exclude only the URL page click on “This page only”.

- To exclude Auto Ads on all site pages with the same URL prefix click on “All pages under this section.” Example, when applied to techvaz.com/phones/, www.techvaz.com/phones/, and other sections under it, such as techvaz.com/phones/samsung will be excluded.
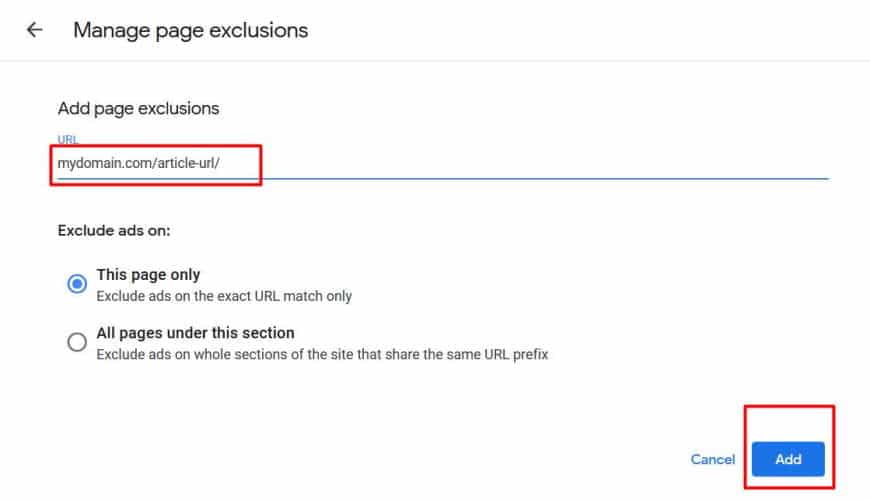
- Add them one after the other.
- All done? Click on Add, go back and click on Apply to site button to save.
Allow 30 minutes to an hour for the new settings to take effect.
Another way to stop auto ads from AdSense from showing on specific pages on your website is to create a URL list and disable Ads formats.
To stop Auto Ads on specific pages by adding a page to your exclusion list, you should be signed in to your AdSense account already. If not, then do so first.
- After signing in, locate and click on Ads on your AdSense dashboard.
- Click on Auto Ads under the expanded Content menu.
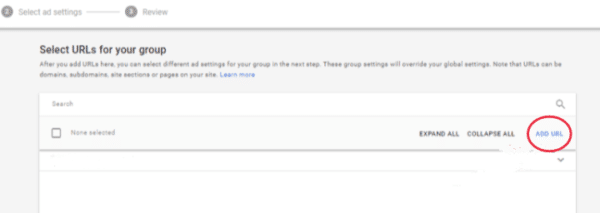
- On the Auto Ads page, click on the New URL group button

- On the next page, click on add URL and add the URLs you do not want ads to be displayed on. Add all the URLs you want.

- Click on next at the bottom right corner after adding the URLs you want to exclude Ads from to proceed to the Ad settings for New URL group.
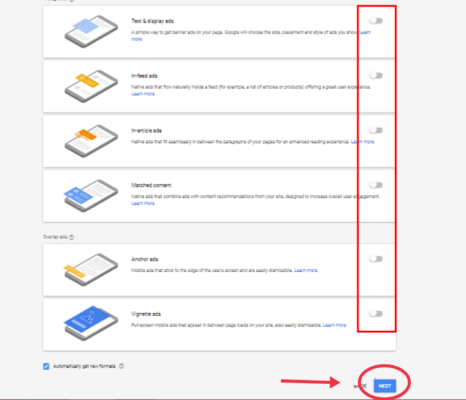
- Now customize the settings for the selected group of URLs. Toggle off all the Ad formats buttons to turn off all Ads for the selected URLs.

- Proceed to click next to review the new ad settings.
- Check the added URLs again and ensure no ad formats have been selected. Save the group with the desired name for easy identification. “No Ads” will be a choice name.
- Now click on save.

Wait for at least 30 minutes to an hour for the new settings to apply on the site pages.
Why stop Auto Ads on specific pages?
While Adsense Auto Ads puts the “ease in easy” as regards placing ads on your website, it does bring a little challenge to having control over how ads are being displayed on the website. This is not good news to publishers that are new to using AdSense.
Auto Ads places ads on automatically, but as we know, not all pages are good for containing ads. Having ads on certain pages is more or less a waste or missus. For instance, there is no need to place ads on your site’s “About” page as traffic to that page is not always much and the kind of information on the page is not something a reader might be willing to battle ads to read. So this should be reason enough to exclude Ads from certain pages on your site.
Adsense does not support the display of their ads on pages that goes against AdSense terms of usage. Doing so might attract a ban from them. So it is in one’s best interest to exclude Ads from being displayed on pages that might bring you a ban from AdSense if your site has such pages.
Frequently Asked Question
Q1. Why is the URL on the exclusion list still showing Auto Ads?
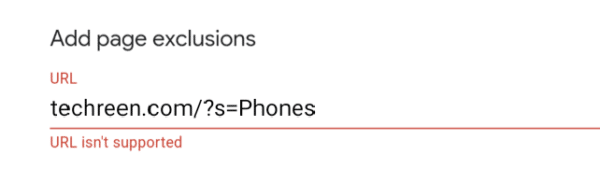
Certain URL types are not supported on the Auto Ads page exclusion. They are not valid as a URL and putting them on the list will make no difference.
- Page URLs that contain parameters are not Supported on the page exclusion list. techvaz.com/?s=Phones is an example of a page URL containing parameters, in this case, the search parameter.

- Page fragment URLs are not supported by Auto Ads. In case you are not familiar with it, Page fragment URLs are URLs that lead to a section within a page on a website. They contain page references or anchors beginning with # immediately at the end of a URL. An example of this is techvaz.com/disable-enable-samsung-pay-quick-access-swipe-up/#What-is-Samsung-Pay.
Q2. How do I remove a page exclusion?
Follow the steps and click in this order just like when adding a page to an exclusion list. Click Ads > Overview > Edit next to your site > Manage under page exclusion section of the site.
- Now navigate to the URL exclusion you wish to remove from the list. Click on More, the three vertical dots to open more actions.
- Now click on Remove.
- Apply settings and allow time for changes to take effect.
Final thoughts
Ads are a very good asset for generating revenue on your site, and if you are new to the game, you might end up losing this if you are not careful. So while you place ads on your site, you have to do it right, not too much not too little, just right enough to get you income but not enough to chase your readers.
