On modern computers, we find very large disks (from 200 GB and more) that allow you to save many files before having to act with cleaning tools. One of the spaces that fill the most is certainly the Windows recycle bin: we throw ourselves into everything without limit and, after a few months, we find ourselves with Giga of useful space occupied by the files we threw away during work and study.
Fortunately, on modern versions of Windows, we can empty the Windows recycle bin automatically using the storage sense, which will delete the oldest files in the recycle bin by itself and recover useful space on the disk. If we have Windows 7 or want to use alternatives we will also show you which programs should be used for the purpose.
Empty the trash automatically with Storage Sense
As mentioned in the introduction we can empty the Windows recycle bin automatically using the Storage sense function, integrated into both Windows 10 and Windows 11.
On Windows 11 or Windows 10 May 2019 Update, we can activate or configure the Storage Sense or run it now option, under the “Storage” section by opening the Start menu, selecting the Settings, and Clicking on System > Storage.
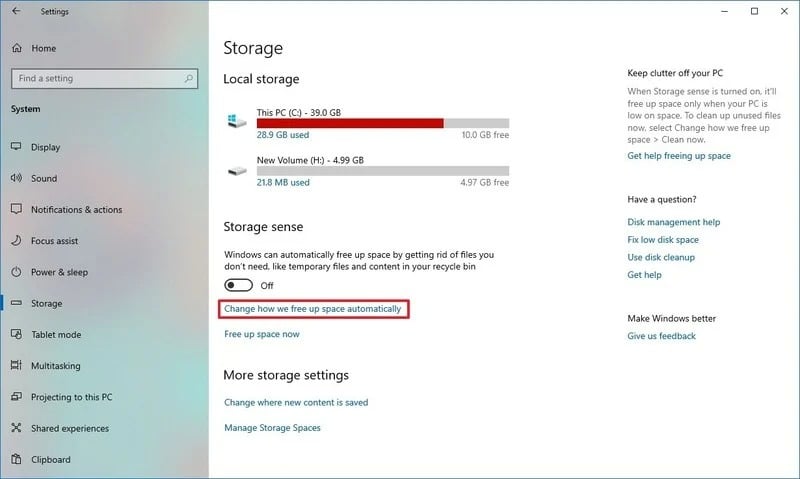
Once this menu is open, turn on the toggle switch. under the Storage sense section and set the Delete item from the Trash files present for more than, choosing the best time period for the tool to act (we recommend 30 days, so as to always have time to recover deleted files). You can also use the Recycle Bin drop-down menu to specify how Storage Sense should clear deleted files automatically:
-
- Never (disables the feature).
- 1 day.
- 14 days.
- 30 days.
- 60 days.
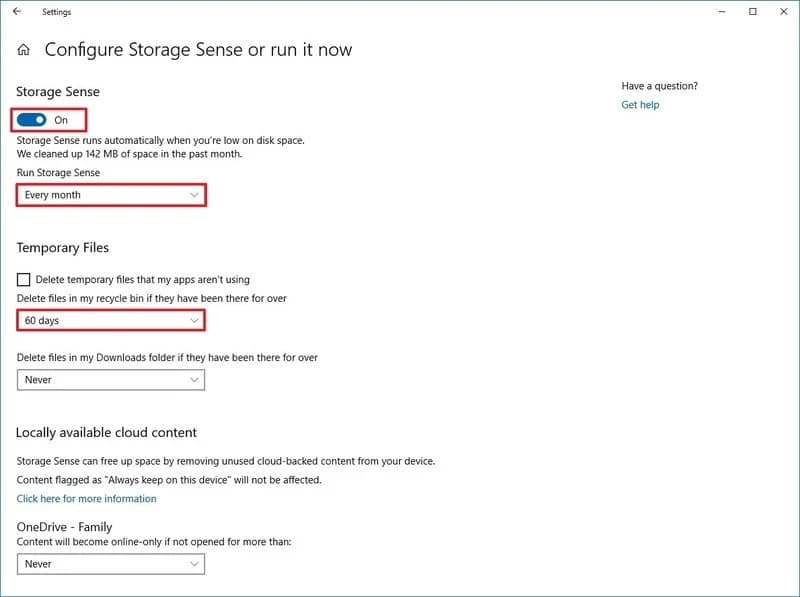
After configuring this item we activate the switch under the item Automatic cleaning of user content and also check the item Maintain the correct functioning of Windows by performing automatic cleaning of system files and apps.
On Windows 10 the procedure is very similar: right-click on the Start menu, press on Settings, and go to the System -> Storage path, where you can immediately activate the Storage sense by pressing the switch at the top of the window. To configure the automatic emptying of the Trash, press the Configure Storage sense item or run it now and set the emptying time by acting on the drop-down menu under the heading Delete files from Trash that have been present for more than.
Programs to empty the trash
As we have seen, it is not necessary to install programs to empty the Windows recycle bin automatically, but if we have Windows 8.1 or Windows 7 as an operating system, it is necessary to use one of the programs below to be able to empty the recycle bin with the same effectiveness seen on Windows 10 and on Windows 11.
1) Cyber-D’s Auto Delete
The best program to replicate automatic emptying on Windows 8.1 and Windows 7 is Cyber-D’s Auto Delete.
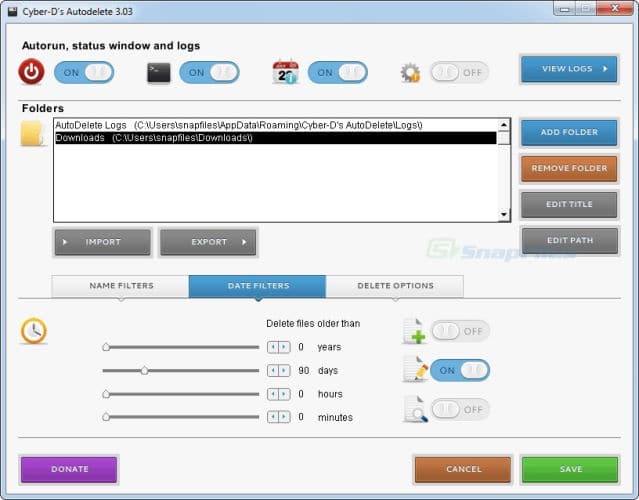
This program, as the name implies, allows you to automatically delete files after a certain period of time.
After installing the program, a configuration window opens with some very intuitive options to be able to delete files and folders automatically or alternatively move them from one folder to another, from one disk to another, or between two PCs on the network.
It becomes so easy, for example, to delete temporary files, temporary Internet files, old backups, old log files, and whatever else you want. In the configuration window, you have to choose the folder on which you intend to delete or automatically move files.
Pressing Add Folder adds a folder, pressing it again adds other paths giving each different rules. By selecting an added folder, you enable the options below that allow you to set filters and adjust the time period.
Filters are really useful, especially for those who work in the IT field because they allow you to choose which types of files to delete or move or which files to exclude. from moving/deleting. To enforce a rule in the filter, simply specify the extension to exclude or include. Finally, in the third section, you decide the time and the action to be carried out.
For the time, you have to decide how many days to delete or move based on: the last modification, the creation date, the last time it was used. The action can be to completely delete the files (without selecting anything), to delete them without the possibility of recovering them with Secure Delete, or to move the selected files to the trash or to another folder; finally whether or not to include subfolders and empty ones.
In the end, the final result will be like this: for the C: / foo folder, on the .txt files, every 30 days from the last modification, delete the files and put them in the trash.
2) CCleaner
Another cleaning tool that we can configure to automatically clean the Windows recycle bin every time the system is started is CCleaner, which can be downloaded for free from the official website.

To use this app correctly, go to the Custom cleaning menu, make sure that the Empty Trash item is active (in the System category), check the other cleaning items as well, then go to the Options menu and check the item Perform a one-time cleaning with the tool Custom Cleanup when Windows starts.
Also on CCleaner, we can activate a sort of “Storage sense” also on Windows 7 and Windows 8.1 by taking us to the Options menu, pressing on Smart Cleaning, and activating the item Enable Intelligent Cleaning.
From now on, when the PC starts, the program will automatically perform a system cleaning, emptying the Recycle Bin of all unnecessary files. Obviously, this method can be too aggressive for the most recent files; to save at least those thrown away in the last 24 hours, open the CCleaner Options menu, go to Advanced, and activate the Delete files in the Trash item only if older than 24 hours.
Conclusions
The Storage Sense of Windows 10 and Windows 11 will allow you to always keep the Recycle Bin clean, deleting the oldest files from time to time and leaving those deleted in the last 30 days. This will obviously make it more difficult to recover files moved to the recycle bin more than a month ago as they will be deleted forever.
If we care about deleted files, we set a higher deletion time on the Storage sense, so as to have more time to recover your deleted files.
Have we lost any documents or photos that were accidentally deleted more than 30 days ago? It is advisable to act immediately with one of the programs seen in the guide on how to find files deleted from the Recycle Bin.
