Most Android users must have come across the annoying error “Insufficient storage available” message when trying to download an app on Google Play Store or when they try updating an app or even when trying to take a photo with your phone’s camera. So, one begins to wonder ……. Why is this happening? Not to worry, this tutorial will give you tips on what to do in such situations.
Cause Of Insufficient storage available?
The major reason for this error is due to the fact your phone’s internal memory is almost used up. Whenever you install an app on your phone, be it in the internal memory or in an external storage like a MicroSD card, a portion of that app is installed on the internal memory because that is where the Android OS is located and hence, needs that portion for effectively using the application.
POSSIBLE SOLUTIONS
Before we go on to try and reclaim space in our internal memory, let us first check to see if there’s actually enough space on the MicroSD card. To do this, follow the steps below:
- Open your app drawer and go to settings
- Under Settings, go to storage
- You should be able to see how much space is left in your internal and external memory here.
- If you do not have enough memory space on your MicroSD, you can continue by doing any of the following.
Get a MicroSD (memory card) with larger memory space
You should get a MicroSD with a larger memory space than the currently installed one to free up space in your internal memory.
Deleting unwanted files
You might also consider deleting photos and/or videos that are no longer relevant to you so as to free up space.
Deleting/uninstalling Bloatware
Whenever most OEMs (Original Equipment Manufacturers) manufacture and ship smartphones, they usually ship these phones with a lot of apps, most of which you might never use because you do not need them, these apps are called “bloatwares”. Bloatwares take up a sizeable space in your internal memory, deleting them can prove useful especially when your device is running low on internal storage.
Clearing app cache data

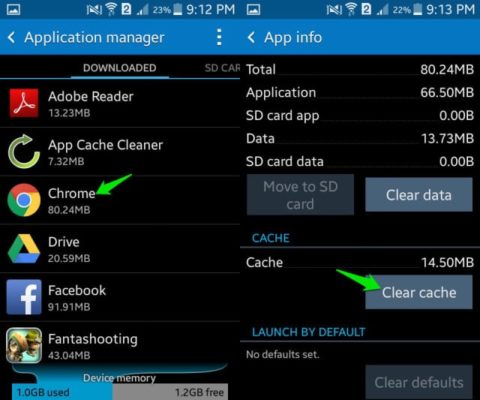
A cache in computing parlance is a memory location where frequently used data are stored and retrieved later for faster processing. App cache data can be cleared with the aid of an app or manually. For the manual method, you do this by
- Go to “Settings”
- Under Settings go to “Apps”
- At the top of the “Apps” screen you should see a menu bar indicated by three (3) dots, click on it or if it’s not available tap on your menu button.
- Click on “Sort by size”
- A list of your apps should show up, tap on any of the apps at the top of the page, on the page that comes up, you’ll find a button labelled “Clear cache”; tap on this button to clear the cache of the app.
- You can do this for other apps as well, but be informed that if you clear an app’s cache files, you will be deleting any data it has saved over time as you’ve used it.
- You can also achieve this by getting any of the several cache cleaning apps on Google Play Store. One of such apps is app cache cleaner which you can get for free on the Play Store. It does the same cache cleaning but in a much easier way.
You can also move some of your data in your internal memory to the MicroSD. You can do this by making use of apps like App2SD and so on. Note that you cannot move all data as some are required by the Android OS to remain in the phone memory, and also some of these apps may require root access.
If you checked and you have enough memory on your MicroSD card, you can do this:
Resetting the Google Play Store app
Resetting the Play Store app can solve this problem sometimes. To do this, follow the same process for clearing an app’s cache; but in this case instead of clearing the cache, you’ll click on “Uninstall updates
Or this:
Backup data and do a factory reset
This should only come as a last resort when the other options are not enough to stop the error. This can work sometimes.
CONCLUSION
With the methods above, you should be able to go around that annoying error message whenever it pops up. If you can’t, then I think it was high time you got yourself a new phone.


