Want to upgrade your iPhone, iPod or iPad to iOS 11 final without losing any of your settings, files, audio, videos, photos and wallpapers, here’s how.
Page Contents:

In this guide, we are going to be talking about how to upgrade to iOS 11 using the Over the Air method in order to keep your Files And Settings.
The final version of iOS 11 is now live and available for all iOS users who have been waiting to get their hands on the latest iOS update. So, if you are on of those people, good for you because you can now get the latest version of iOS on your device. However, updating your ioS version means you will lose all your files and settings. To avoid this, you can simply use the over the air method to update your iPhone, iPad or iPod touch to the latest iOS version. The method is very easy, quick and isn’t stressful at all. Also, when you are done updating, you will still have all your files and settings back in place, except for the latest iOS update running on your smartphone.
Things To Put in Place before Updating
1. Check Your Device compatibility Before Proceeding
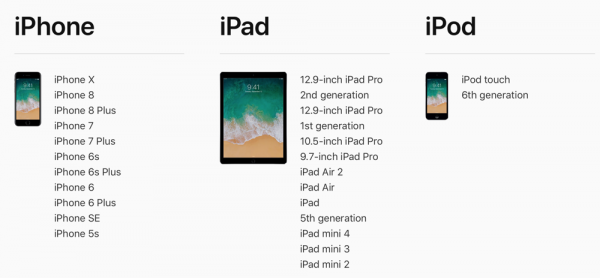
iOS 11 is supported by a wide range of iPhones and iPads but only the iPod touch. All iPhones before the iPhone 5s are not compatible with the new iOS 11 updates. This leaves us with iPhones from iPhone 5s to iPhone X. All iPads before the iPad mini 2 are not compatible. This leaves us with iPad mini 2 to the mini 4 and the iPad 5 to the latest and greatest iPad Pro. The iPod touch sixth generation is also compatible with the new iOS 11 update. So if you have an iPhone 5 or any other iOS device that is 32-bit, then you are out of luck.
2. Chare your device to at least 50% Before Updating
Normally, iOS updates will not install on your device if your battery life left is not up to 50%. So, I would suggest you make sure that your battery is up to at least 50% charged and that it remains plugged in throughout the entire update process. So I guess its better to have your charger with yo when you want to begin the download and installation process.
3. Connect to a WiFi Network
You will not be able to update your iOS device using your cellular network. You must be connected to a WiFi network to be able to update your iPhone, iPad or iPod touch. To connect to a WiFi network, go to Settings > WiFi and then pick a WiFi network.
How To Update Your iOS Device to iOS 11 Using Over The Air (OTA) Method
After you have made sure that the things listed above have been put in place, follow the steps below to update your iOS device to iOS 11 using Over the Air method.
- Open the Settings app on your device.
- Tap on the “General” option.
- Tap on the “Software Update” option at the top of the page.
- The page will refresh and the iOS 11 update will appear on your screen after a few seconds. Tap on the Download and install button at the bottom of your screen.
- The Update Requested prompt will appear on your screen. After a few seconds, the iOS 11 update will begin to download on your device.
- As soon as the update is finished downloading, a pop up will appear on your screen asking you to install iOS 11 on your device or delay it. Tap on the “Install Now” option.
- Your device will begin to install the iOS 11 update. When it is done, it will restart your iPhone, iPad or iPod touch and then boot you back into iOS 11.
- You will be prompted to enter your Apple ID and password. Go ahead and enter it.
So that is all! You have successfully updated your iOS device to iOS 11 using Over The Air method and you didn’t lose any of your files. If you get stuck, make sure to leave a comment and we will get back to you. Thank you!

