What is Odin and what is it for? If you don’t expect much from your smartphone, you may never have heard of Odin, a god of Nordic mythology. However, if you start navigating a little in the world of manual updates on your Samsung, you’ll find out how much you need Odin. In this article then, as you will already have understood, we will talk about Odin, what is it and how it works.
What is Odin?
Odin is a PC program (Windows) that allows us to manually update and install the official Samsung firmware on our device, ie install the operating system with Android on our Samsung. It also allows you to do other things, like installing custom ROMs, recovery, kernels and so on; but the purpose of most users is to change the operating system of their Samsung.
The program we are talking about in this article is the software used in specialized centers or technical services of Samsung to repair the devices. Of course, the simplest thing is to install an official firmware.
To install a custom ROM (unofficial firmware) first we will have to install a custom recovery. To find the official firmware our recommendation is to visit SamMobile, as it has a huge and updated firmware catalog available for Samsung devices.
In case it was not clear, Odin is a tool that serves only to change or modify the software (firmware, restoration or anything else) of a Samsung device. For other functions, there are other tools.
How is Odin used?
The first thing you need to do is download it. Samsung does not officially share this software, but there are developers who do. The best way to find the latest version is to visit this thread from XDA Developers. At the end of the first post you will find all the versions available- make sure you download the latest version.
The file to be downloaded will usually be found in a folder that contains an executable file named Odin plus the version number and with an .exe extension. There are also other files needed to run the program, but they are not executable and their number depends on the version.
To use Odin with our smartphone, the Samsung drivers must be installed on the PC, which are usually installed automatically when you connect the smartphone to the computer via a USB cable. In the smartphone, we will activate the ‘USB debugging‘ in the developer options (to activate the developer options, go to Settings> Device information and click on Build number several times).
Before starting, it is always mandatory to make a backup of all the information stored on our device. When we open Odin, we have to start it as administrators. To do this, right-click on the Odin icon and select Run as administrator.
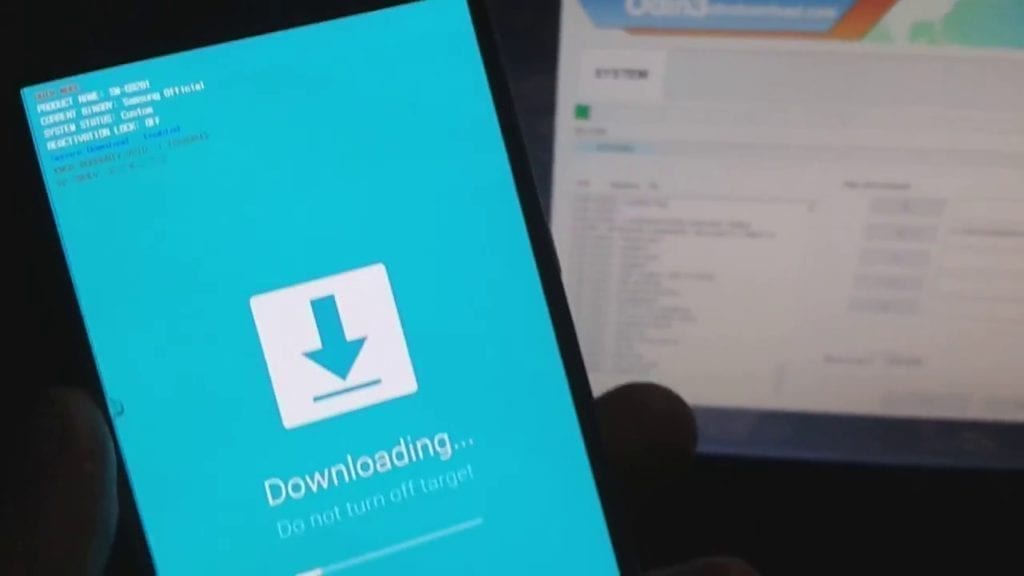
So we have to connect the smartphone to the PC in a special mode. Turn off the device and turn it back on in download mode. Once turned on in this mode, you can connect it to your computer.
When Odin recognizes your device in the “Log” box, a new line with the identification number will appear next to “Added”, which means that Odin is connected to our Samsung device and is ready to provide us with the software we want.
What do we find inside Odin?
Odin is a program that performs complicated tasks with a few buttons and options that we will see carefully. Read on to learn more.
- BL– with this button, we can choose the file to flash that contains a new bootloader. This is usually unusual, so you can do without it for now.
- AP– this box is the one that will be used to place the file containing the new official firmware, ROM or recovery that we have previously downloaded. They are usually .md5 or .tar files that contain the complete ROM or recovery image.
- CP– this section is usually used to include the modem, in case it is not included in the custom ROM, but it is something that is generally not installed. Modem files usually look for the .bin or .tar file.
- CSC– in this box, you enter the codes “country” to install the ROMs related to a specific region. This allows you to change the settings for the location and language. Also in this box, it is usually not necessary to insert anything unless the ROM is accompanied by a CSC file.
“Options” tab
- Automatic restart– this is the first box displayed above in the Options tab. This option is always selected by default because it automatically restarts the device at the end of the process, something necessary for the correct installation of the ROM.
- Re-Partition– if it is selected, the ROM we install will have no previous applications or user configuration. Normally, do not check this box unless requested by the installation process.
- F. Reset Time– this box is used to perform the reset with Odin after the process, as well as in the terminal. It is usually selected.
- Nand Erase All– this is an option that should not be marked for any reason. Unless you know what you’re doing.
- Flash Lock– do not touch this option, it is used to close the bootloader (or boot manager) if it is open.
- Phone EFS Clear– this option has appeared since version 1.3 of Odin and is used to delete the contents of the / efs folder on the phone, so you never have to mark it. The EFS folder contains very important data such as IMEI, sales code or product code, among others, and are essential for the normal operation of the terminal.
- Phone Bootloader Update– this option is responsible for flashing the bootloader that overwrites it, so if we already have access to Download / Recovery via the buttons, we should not use it.
‘Pit’ card
In this tab, we can select files with .pit extension, files responsible for maintaining some configurations required for some ROMs, for example, to describe the location of partitions. Normally it is not necessary to include these files.
The ‘Start’ button
Once we have entered all the necessary files, we will only have to click on the Start button. In the Log box, we will have the list of the operations that are performed. At the end of the installation, the box on the top left will appear in green with the word “PASS”. Once the process is finished, the device will restart.
We hope to have been helpful. Leave a comment below if you like!
