Have you ever come across an amazing photograph of something online, and tried to discover where precisely the photo was snapped? If its a photo of something popular then you can have a clue, but for other types of photographs a quick research might give you the answer of where the picture was taken.
Finding The Location Using GPS Data
The cameras and smartphones these days use a format for images called the Exchangeable Image File Format a.k.a ExIF. ExIF can be used for so many things, and one of those is storing the GPS information recorded by a phone or camera at the time the image was taken. For EXIF data to record the location, the photographer must have turned on EXIF metadata on their phone, and even have GPS enabled.
Exif Data
EXIF data stores several information about a picture. In it, there are lots of precise details that can be seen:
ISO speed
Shutter speed
Aperture
White balance
Camera model
Date and time
Lens type
Focal length
Location data
Definitely, we are concentrating on the location data. Lets discuss how you can enable the GDP while you capture photos?
1. Enabling GPS And Location Services
Several SLR cameras cannot use GPS, but that should not bother most of us since we are all using our mobile devices as cameras now. Because of the popularity of smartphones now, more and more phone owners can now take fantastic photos as we also make use of the Internet to gather vital info.
Whether you possess an iPhone, a Windows phone, or an Android device, it s simple to locate the GPS or Location setting.
Here is an easy example using an Android smartphone:
- Head to Quick Settings or Settings. Quick Settings is done by swiping down while Settings is done by tapping the Settings icon.
- As soon as you can view the Location under Quick Settings, simply tap it to activate. If you are browsing the Settings area, Head to Personal and you will see Location. Click the right area where OFF is shown to enable it.
- Long press Location under Quick Settings to view the mode, Recent location requests, and Location services. This can be reached by checking under Settings by clicking on Location.
There are 3 modes:
High accuracy – makes use of GPS, Wi-Fi, and mobile networks
Battery saving – makes use of just Wi-Fi and mobile networks
Device only – Dependent on GPS.
The fourth step is heading to your Camera app and access Settings. Under Misc, you will view Location services. Just click on the check button enable it. .
After this, you can snap your pictures and know that they will be geotagged and will contain EXIF data.
2. Seeing The Location Data
As long as it is geotagged, knowing its location should be easy.
Making Use Of A Smartphone – Just check the details of the photo taken. Most times, the latitude and longitude are posted. If the phone is connected to the internet, it might even show an exact address plus a snippet of its location on Google Maps.
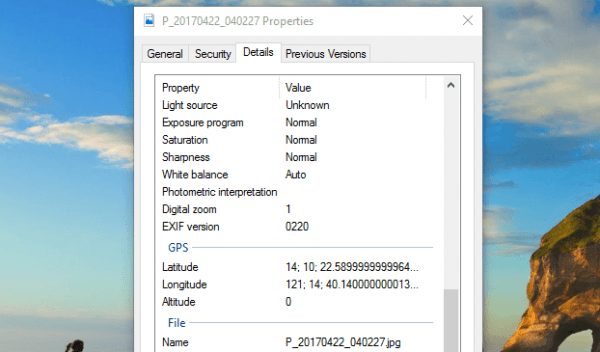
Making Use Of Windows – Fist, you have to download the photo. After that, right-click it to view Properties, then Tap Details. Scroll down and you will find GPS, which should be sen below the Advanced photo section. Latitude and Longitude are posted here.
Making Use Of Mac – It is identical to that of windows. Download the image. After that, right-click it to see Get Info. You will be able to view the location at the More details section.
3. Make Use Of The Coordinates On A Map
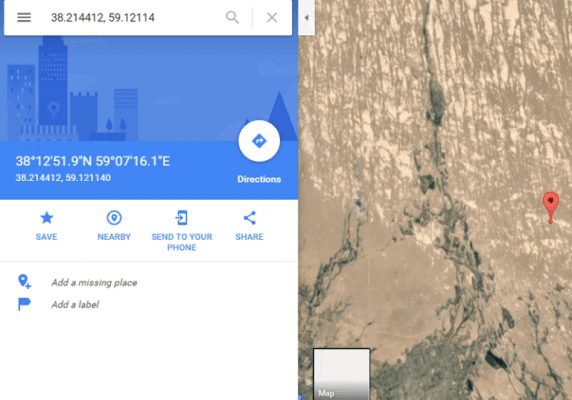
Now that you have the latitude and longitude, you need to input them on a map. The most accessible and popular map to utilize is Google Map, and it can be used on both PCs and portable devices.
First, open Google Maps. Then search for the coordinates.
Be aware that three formats are acceptable:
Degrees, minutes, and seconds (DMS)
Degrees and decimal minutes (DM)
Decimal degrees (DD)
The latitude and longitude on an Android device can be in DD. Format usage can be different on several platforms but coordinates are constant.
As soon as the longitude and latitude are entered, you will view a PIN telling you about the location.