Today, I shall be your guide on how to Root Infinix Hot Note Pro after upgrade to Android 5.1 Lollipop. The rooting process for Infinix Hot Note Pro after upgrade from it default Android Kitkat to Android 5.1 Lollipop is different because KingRoot will not give the device root access.
Let’s quickly look at what rooting is for the sake of those that are new to rooting phones.
Rooting according to wikipedia, is the process of allowing users of smartphones, tablets and other devices running the Android mobile operating system to attain privileged control (known as root access) over various Android’s subsystems. As Android uses the Linux kernel, rooting an Android device gives similar access to administrative permissions as on Linux or any other Unix-like operating system such as FreeBSD or OS X.
Before proceeding, I will like you to read the disclaimer below carefully.
Disclaimer – Please note that TechVaz won’t be responsible if your device gets bricked in the process of rooting. You should also be aware that rooting your device might void the 12-month warranty given to your smartphone.
REQUIREMENTS:
- SP Flash Tool V5 and above (download HERE)
- Recovery for Infinix Hot Note X551 5.1 Lollipop (download HERE)
- SuperUser For Hot Note X551 (download HERE)
- A working PC
- Good USB cable
How To Root Infinix Hot Note Pro After Upgrade To Android 5.1 Lollipop
- Copy the download SuperUser .zip file to your memory card.
- Unzip the SP Flash Tool
- Unzip the Recovery For X551 Lollipop
- Open the SP Flash Tool folder and open the Flash Tool software in the folder
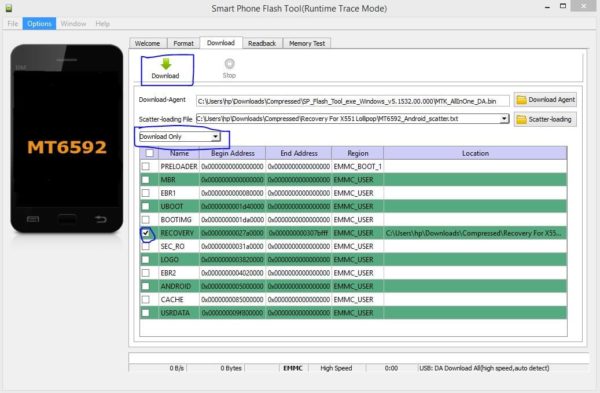
- Click on the scatter loading button and locate the Recovery For X551 Lollipop folder on your PC, open the folder and select the MT6592_Android_scatter file
- Only the RECOVERY file will be loaded and marked in the SP Flash Tool
- Select Download Only in the SP Flash Tool box and click green download button.
- Now, switch off the phone
- Plug in your phone, and wait for it to show a dialogue box saying SUCCESS! Then unplug your phone from the PC
- While the phone is still off, press the Volume UP and Power button together until you see Philz Touch Recovery.
- Click Install Zip from SD CARD
- Install the UPDATE-SuperSU-V2.46.zip you placed on your SDcard earlier
- Restart the phone
** Congratulations to you for Root **
Your Phone is now rooted if the above procedures are done properly.


