I always make sure to keep redundant contacts as they tend to completely clutter the Contacts app. I keep track of all contacts in my address book to make sure that unnecessary contacts do not find their way into the list. Thankfully, there is an easy way that can be used to merge and remove duplicate contacts on Mac and iCloud.
Does your address book seem like a mess as well? Follow the easy steps below to get rid of the unwanted stuff so that the Contacts app looks more organized. Just make sure that you have the latest backup before you proceed with it.
How to Merge and Remove Duplicate Contacts from Mac and iCloud
How to Merge and Remove Duplicate Contacts on your Mac
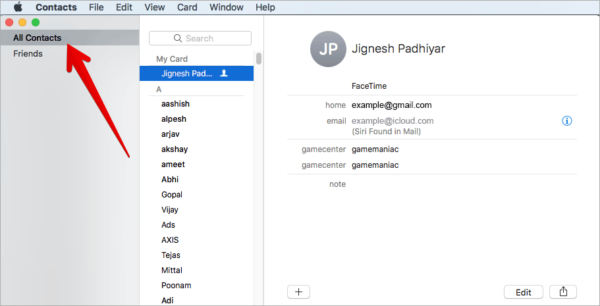
Step #1. Launch the Contacts app on your Mac.
Step #2. Next, make sure that All Contacts is selected in the Groups panel on the left side of the window.
Note – Just in case the Groups view is hidden, click the View in the menu bar and then click on “Show Groups.”)
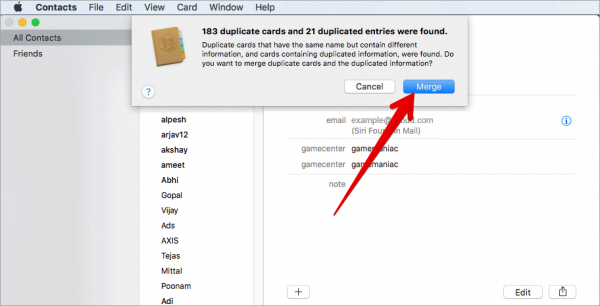
Step #3. Next up, click on Card and then click “Look for Duplicates…”
Now, a drop-down dialogue will appear with the total number of duplicate cards which were found. These duplicate cards may have the same name but their information is different or they have the same name and the same information.
To merge the duplicate cards and information, click on the Merge button.
You can also remove unwanted contacts from iCloud. The sweetest thing about this method is that you can easily select multiple contacts and clean them up easily. Read on to learn more.
How to Remove Duplicate iCloud Contacts on PC and Mac
Step #1. Launch a web browser on your iPhone, iPad or computer and then go to the iCloud website (icloud.com).
Step #2. Next, enter your iCloud details and sign in.
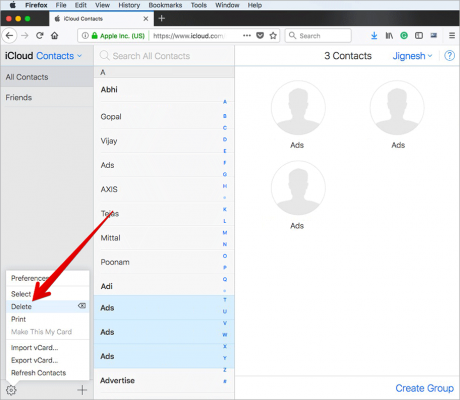
Step 3. Now, you need to click Contacts and then click on Select Contacts on the left corner of the window.
Step #3. Next, you need to hold down the Command (⌘) key and select the duplicate files you want to get rid of.
Step #4When you are done, click the cog icon in the bottom left corner of the window and then click on Delete in the menu that pops up.
Step #5. Finally, confirm that you wish to remove the selected contacts. To do so, click the Delete option in the Dialog pane.
That is all!
Wrapping up
So with these few easy steps, you can make sure that your address book never gets cluttered or disorganized. If you have any questions, make sure to share them with us in the comments section below.


