When we’re bookmarking the very first page in Chrome, we usually have no idea how messy it’s going to become soon. We initially bookmark only a few websites and before we know it, our bookmark list is so full that we can’t even find what we really need.
To avoid this kind of issue, you have to organize your bookmarks. If you want to get out of a bookmark mess and organize your bookmarks better, well you are on just the right page.
How to Display The Bookmarks Bar in Chrome
If you want to see all your bookmarks in one place, you need to first turn on the “Show bookmarks bar” feature in Chrome settings. To do this, go to Chrome and select the three dots in the top right corner of the window to open the menu. Once in the menu, find the “Bookmarks” option and select or hover your pointer over it. You will see a new list. From the list, select the “Show Bookmarks Bar” option.
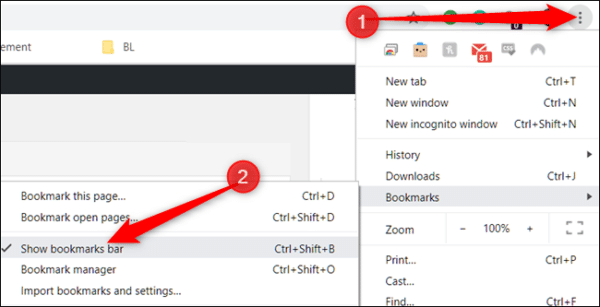
A quicker method you can use to get this done is by pressing the Ctrl + Shift + B keys on your keyboard. Once you do this, your bookmarks will appear right under the search bar at the top of the Chrome window; you can use the same shortcut to hide the bookmarks bar.
How to Bookmark a Page in Chrome
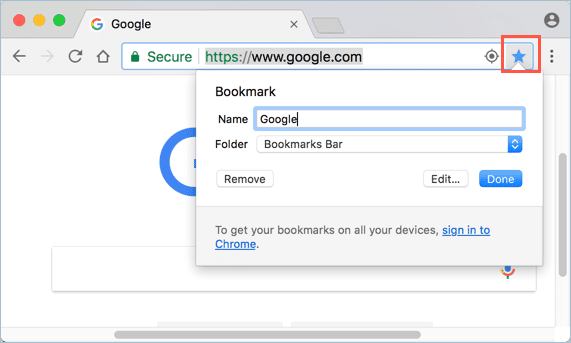
Bookmarking a page in Google Chrome is painfully easy. All you need to do is click on the Star icon on the right side of the search bar where the URL of the website is displayed. Once you do this, you will see a window pop up on the screen. You can then rename the bookmark or simply save it if you are fine with its current name. To do this, click Done. Chrome also allows you to add a web page to a folder. We will cover that later on in this guide.
If you have bookmarked a page but no longer want it to appear in the list of your bookmarks, you can easily remove it in a few steps.
Simply go to Chrome, click on the three-dot menu icon, click Find Bookmarks, and once the list comes up, look for the page you would like to remove, right-click on it and then select the Delete option.
How to Import Bookmarks From Other Browsers to Chrome
If you have some pages that have been bookmarked on other browsers, you can easily upload them to Chrome to make it easier to manage all your bookmarks in one place. Chrome is built with smart technologies to help you find your old bookmarks while you’re installing it but it misses some, however.
If this is the case, you can easily import them from other browsers and not have to create them all over again. To do this, follow the steps below.
- First off, go to Chrome and click on the three-dot menu icon.
- Go to the Bookmarks option and place your pointer over it.
- Once the bookmark list appears on the screen, go to the Import bookmarks and settings option and click on it.
- Select where you would like to import the bookmarks from and then click the Import button.
- Once you do this, the bookmarks will be imported from the browser and saved in a folder in the Bookmarks bar or in Other Bookmarks.
How to Back Up Your Bookmarks
To prevent against loss of your bookmarks you can easily back them up. With this, you will be able to import them on any Chrome browser on any device. To back up your bookmarks, follow the steps below.
- First off, go to Chrome and click on the three-dot menu icon.
- Next, go to the Bookmarks option and select the Bookmark Manager option from the list that comes up. An alternative to this is to simply press Ctrl + Shift + O on your keyboard.
- Now, select the three-dot icon in the top right corner of the window.
- Next, the “Export bookmarks” option.
You should see a dialog box on the screen. In this dialog box, you can set the name of the file as well as where you want it to be saved on your PC.
How to Organize Your Bookmarks in Chrome
Just like how an optimized and organized working space helps makes you stay focused, if you keep your bookmarks organized, it will be much easier for you to find them when you need them.
Below, we have listed a few tips to help you keep your bookmarks organized in Chrome so you don’t end up scrolling through an endless list when looking for a particular web page.
- First off, organize a big cleaning. You definitely have bookmarked quite a number of pages you felt would be useful or you would check out later only to never even check them out again. If this is the case, ask yourself if you really would open these bookmarks any time soon and if the answer is no, delete them. Having a Bookmarks list cluttered with entries you do not need will do you no good.
- Create folders for different categories. You can organize your bookmarks based on what you intend to use them for. Some ideas include Study Material, Recipes, Read Later, Useful tools, and so on. Keeping your bookmarks in different folders will make them much more accessible and easy to find. You can create a folder by following the steps below.
- Go to Chrome and click the three-dot menu icon.
- Next, move the pointer over to the Bookmarks option and then select “Bookmark Manager.”
- Now, click the three-dot icon in the top right corner of the screen and then select the “Add folder” option.
- Give the folder a name to help you identify it and then select where you want it to be saved.
- You can add bookmarks to the folder by dragging them over to the folder.
- Remove any bookmarks that you have saved more than once. Another reason your bookmarks list may be clutter is because you have saved some bookmarks more than once. You can fix this issue using a Chrome extension. One good extension is the Bookmarks Clean Up extension.
- Rename your bookmarks to make the Bookmark Bar look more compact. One way you can create space on the bookmarks bar is by shortening the name of your bookmarks (or removing the names if the icons are recognizable). To rename your bookmarks, follow the steps below:
- Move your mouse over to the bookmark you want to rename and right-click on it.
- Select the Edit option from the menu and then type in a new name for your bookmark.
- When you are done, click Save.
- Create separate sections to make it even easier to access pages in your bookmarks. You can make your bookmarks even easier to access by putting related folders in the same section. This can be done using websites with vertical or horizontal dividers – they’re very simple to use and the effect is amazing.
What other methods do you use to keep your bookmarks organized? We would love to hear your ideas in the comments below.
