
Do you currently have no clue about the DNS server you are using and badly want that information? Or did you set up a new DNS server on your machine and you don’t know if it is working or not? Well, not to worry, this tutorial will break down the different ways to check it once and for all. See What DNS Server Am I Using? Here Is How To Find Out:
What DNS Server Am I Using? Here Is How To Find Out
1. What DNS Server Am I Using – Windows 10/8/7
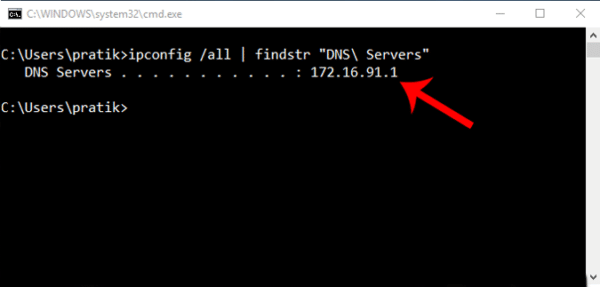
To confirm the DNS Server you are using on Windows, just open up the command prompt. To make that happen, tap “Start,” then “All Programs,” then “Accessories,” and finally “Command Prompt,” and then run the following command:
“ipconfig /all | findstr “DNS\ Servers”
Be aware that this command simply pulls all the network configuration values and then filter out the “DNS Servers” line from it.
You Might Also Want To Read: How To Fix OpenDNS Phishing Threat In 2021
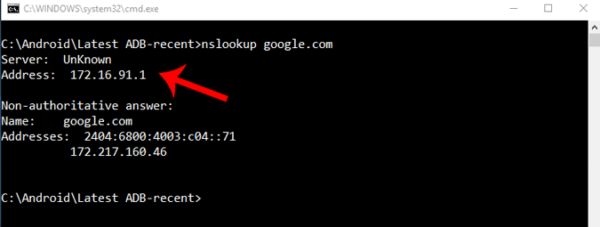
The 2nd method is less complicated and it has a user-friendly command. Just do a “nslookup” of any web address and Windows will show what DNS server you are using as part of the lookup. To do a nslookup, just use the command below. “google.com” can be replaced with any web address of your choice. In fact, it can even be replaced with your own IP address:
nslookup google.com
2. What DNS Server Am I Using – Linux:
To check what DNS server you are using on Linux, just open up the terminal and do “nslookup” for any website. Simply type in the command below. “google.com” can be replaced with your own IP address too:
nslookup google.com
The “nslookup” is a command-line utility that resolves the DNS name to an IP address, thereby revealing the DNS server used in the process.

3. What DNS Server Am I Using – Mac:
Just like on macOS, open the terminal and type the following command:
Launch the terminal on macOS, press CMD + SPACE to launch Spotlight, and then type in “terminal” before hitting enter. Or, just access your Application folder, open “Utilities,” and then double-click on Terminal. As soon as the terminal windows open, copy-paste the following command before tapping enter:
nslookup google.com
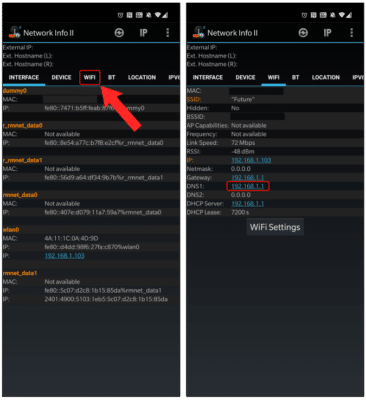
4. What DNS Server Am I Using – Android:
Many Android network scanner applications show you the exact DNS you are using, but I would recommend Network Info II. This application is ad-free and simple to use. Just download it from the Play Store, launch, and head to “WiFi.” Right there, you’ll see DNS 1 and DNS 2 entries; these are the DNS servers you are using.
You Might Also Want To Read: How to Watch HBO NOW Outside US with Smart DNS Proxy
5. What DNS Server Am I Using – iOS:
Network Analyser is a free iOS application that reveals vital information about your network. It even has a premium version that costs $3, but the lite version is sufficient even if it supports ads for your simple need. Simply install and launch the application; you can see which DNS you are using close to “DNS Server IP.”
There you go. If you ever need to know the precise DNS server you are using at any point in time, you now know what to do and how to go about it.
