If you are an owner of an old or even TCL Roku TV, you have access to a premium feature that can be accessed for free. This feature enables you to pause and rewind live TV. You can enable this feature by plugging in a USB drive to one of the built-in ports on the TV and then rewind up to 90 minutes of live TV. Even better, this feature isn’t exclusive to only the flagship Roku TVs, you can access it on pretty much any model.
Pausing and rewinding live TV is one feature that can only be accessed by paying on most cable or satellite companies. Once upon a time, even, this feature required you to purchase a separate bulky device. However, you can access this feature for no cost on your Roku TV and in only a couple of steps, you will have it set up. All you need is a 16 GB flash drive.
This feature comes with some limitations, however. One of them is that you can only pause live TV for up to 90 minutes. Also, you need a flash drive of at least 16 GB of storage space so as to provide the required storage space. This means you can not use a drive that is any smaller. Also, if you use a larger drive, you will still be limited to 90 minutes. As such, there is no use plugging in a larger drive.
Another limitation of this feature is that you can only use the pause function on the live TV input. This means that you are limited to whatever is coming over your antenna or cable connection.
So keeping this in mind, let’s proceed to the guide. Below, we will show you how to add USB storage to help you pause and rewind live TV on your Roku TV.
How to Pause and Rewind on a Roku TV
If you want to add storage and live TV pause to your Roku TV, you will need a couple of items. These items are listed below:
- Roku Smart TV
- Live TV input (Antenna or cable)
- Roku TV remote control (or connected Roku smartphone app)
- A USB 2.0-compatible flash drive, 16GB or larger
Before you proceed to use any drive, make sure that you do not have any important files in it or that the files stored in it are backed up somewhere. This is because before the live TV feature can be used, your Roku TV needs to format the drive. Although you can still use your drive to save files after you have unplugged it, you will lose all the files that were previously saved on it.
How to add USB storage to a Roku TV: Step-by-step guide
Once you have the devices listed above available, you can proceed to add USB storage to your Roku TV. To add USB storage to your TV, follow the steps listed below:
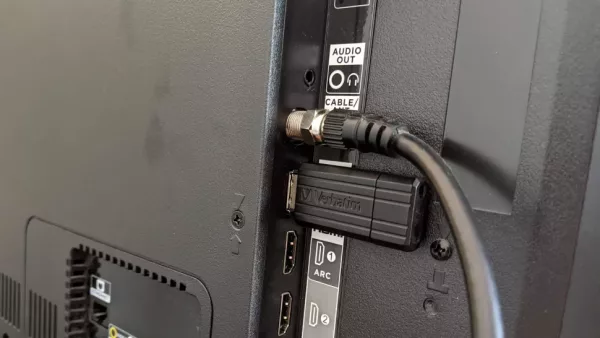
- First off, locate one of the ports on your Roku smart TV. Just like most smart TVs, the USB ports should be located on the side or the back of your Roku TV. Your TV may have more than one port, so you can use whichever one you want. However, you need to make sure that you have no other USB drives plugged into the TV during the process.

Plug USB Drive Into Port - Next, plug in your USB drive to your TV via the USB port.
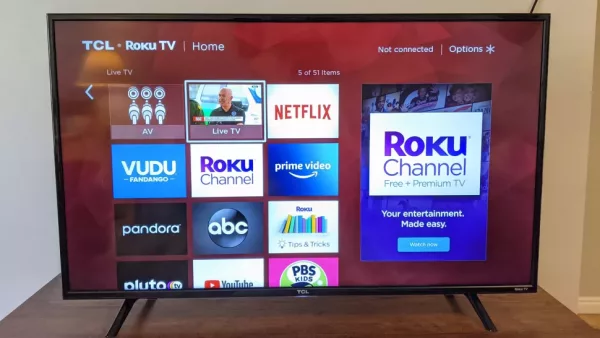
- Now, you to the home screen of your Roku TV and highlight the live TV input. Instead of selecting the live TV option, press the Star button. This will take you to the options menu.
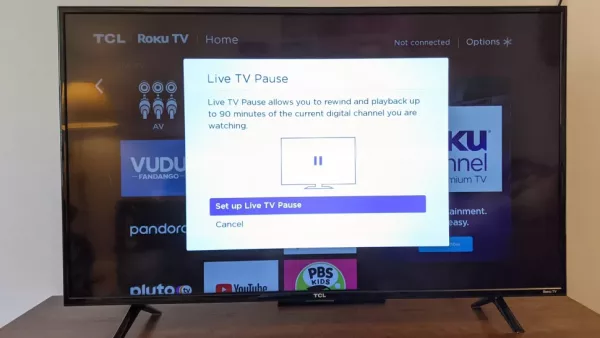
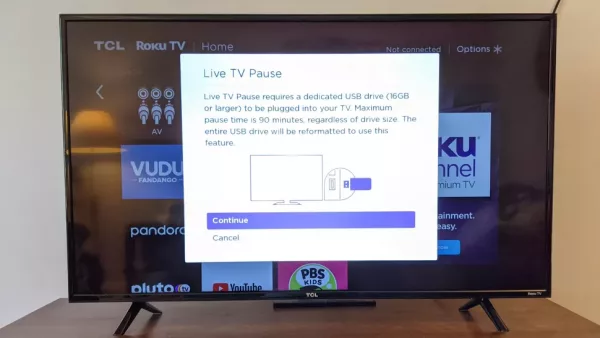
Select Live Tv - On the options menu, select the “Set up Live TV Pause” option to proceed to setup.
Set Up Live Tv Pause - Follow the instructions that are displayed on the screen to set up the Live TV Pause feature. Once you are done the Live TV Pause feature will be activated.
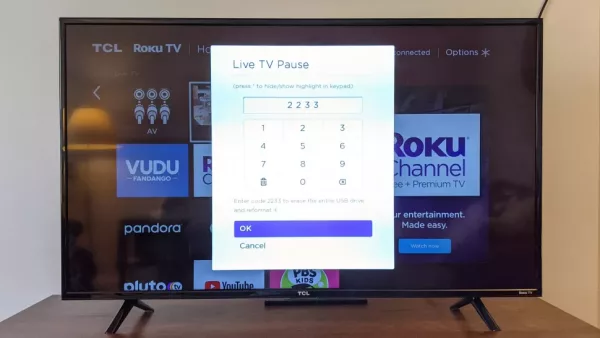
Select Set Up Live Tv Pause To Begin Setup - Next is to reformat the USB drive you plugged in. To do this, you will need to enter a PIN number to approve the reformatting. This PIN number isn’t a security check. It is only to make sure that you do not format a drive with important files in it accidentally. If your drive is ready to reformat, you will see the confirmation code right under the keypad of the prompt displayed on the TV screen.
Follow On-Screen Instructions - Now, use the directional pad on your Roku TV remote control to enter the confirmation code. Once the confirmation code has been successfully entered, the reformatting process will begin.
Enter Confirmation Code

Once the process is complete and the drive has been reformatted, the pause live TV feature will be enabled for you to use.
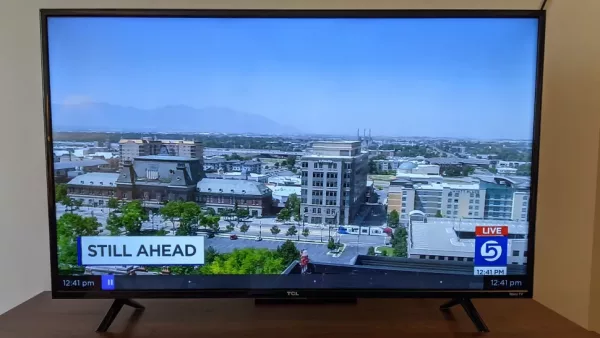
Now that you have the pause live TV feature enabled, you can now get to pausing live TV using the play/pause button on the Roku TV remote control
After you have paused live TV, you can then fast forward through content and also rewind through them. This can be achieved using the appropriate buttons on the Roku TV remote control.
Now that you have up to 90 minutes of paused TV saved to the drive — although the USB drive is only a cache for pausing, as you cannot transfer the saved video from the USB storage to another device — you can pause a show and come back with enough saved time to skip ads.
If you want to disable the live TV pause feature, all you need to do is unplug the USB drive from your Roku TV.
So what do you like the most about the Roku TV? Let us know what your favorite features are via the comments below.
