A font in typography and computing is the writing visible in print and on the screen. Fonts are, therefore, the graphic models used to write on the computer. For example, on a program like Microsoft Word, you can always choose the font from a convenient drop-down menu to choose the most suitable text for the document you are creating.
Page Contents:
You are often forced to use a specific font for official office documents. This font is also necessary for printouts and documents shared via PDF (which must be very professional). This doesn’t mean that the fonts can’t be used for work: new and exclusive fonts are often created for use in advertising campaigns or on personalized messages.
Suppose you want to change the monotony of texts that are all the same in this guide. In that case, we will show you how to install new fonts on Windows to write documents and sheets on the computer with unique and personalized writing, particularly beautiful to see, especially if you write documents to share.
READ ALSO -> Best 16 sites to download free Fonts in 2024
1) Install new fonts on Windows
All in all, installing fonts in Windows 11 and Windows 10 is very simple, but only if the font you want to install is in the .ttf format (True Type font).
After downloading the new font, double-click on it to start the installation within the operating system; alternatively, you can right-click on the file and choose Install from the context menu.
On Windows 11, the installation procedure can also be performed from the Settings menu by pressing WIN+I on the keyboard, pressing Personalization, and dragging the fonts to the top of the window (Install by dragging).
Alternatively, you can also press the Browse and install fonts button and load the special fonts from the download folder.
At the end of the installation procedure, the new font will be available for use with Word or other programs that access the font folder in the operating system.
Manually install fonts
If you have many fonts to install, you can also use the manual procedure to add them to the system; to proceed, open File Explorer, go to the path C:\Windows\Fonts and drag the new fonts into this folder.
2) Where to download fonts for Windows
Are the fonts in the Microsoft Store ugly, or do they not reflect our needs? Luckily, there are several ways to download new fonts and typefaces to make the process of creating documents a lot of fun and even more professional in some respects.
Microsoft Store
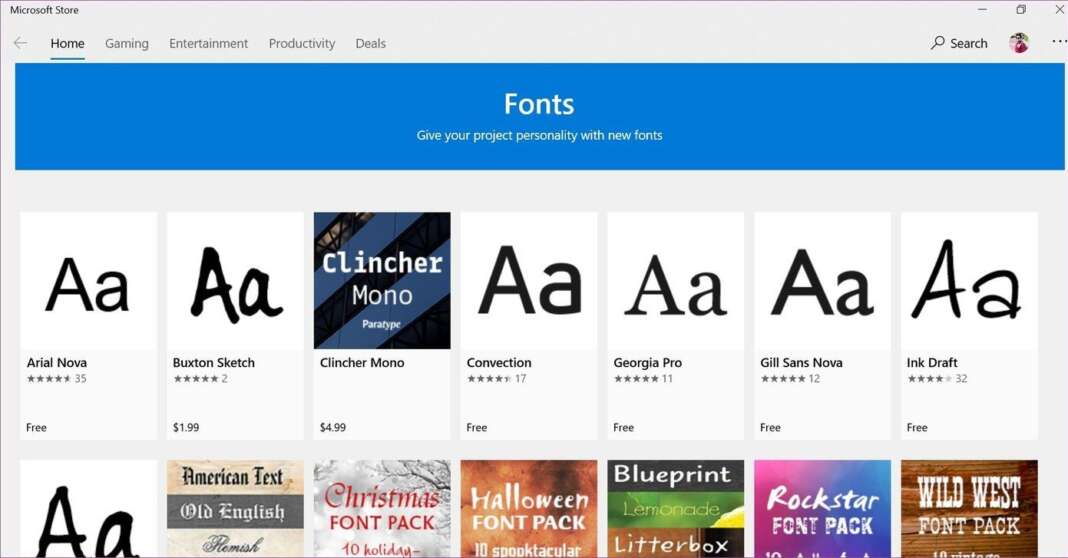
The first source to use to download fonts is the Microsoft Store, which is the official Microsoft store. To follow this path, take us to the path Settings -> Personalization -> Fonts and press on Get other fonts in the Microsoft Store; alternatively, you can also simply open the Microsoft Store app and search for “font” in the top bar.

This will open the section of the store reserved for new fonts, which can be freely downloaded to the computer by simply pressing on the font you want to add and finally clicking on Get.
Online font sites
In addition to the Microsoft Store, you can download new fonts for Windows by visiting various sites full of fonts and fonts to download for free from sites such as:
- FontSpace specializes in sharing free fonts made by graphic designers from all over the world.
- Fontsquirrel downloads free fonts that can be used for commercial purposes.
- Google WebFonts are the recommended Google fonts for most websites.
- DaFont is a very large site full of fonts to download, many of which can be used freely, even for commercial reasons.
- 1001freefonts is a free site whose use of fonts is also free for commercial purposes.
- MyFonts with a nice collection of fonts to download and with a font recognition tool from images.
- WhatFontIs allows you to identify the type of font used on logos and images.
- UrbanFonts with different types of characters are less formal and more fun and playful.
- Searchfreefonts which, like the others, shows the custom preview.
- Font Zone where you can also find classic fonts such as Garamong, Calibri, Helvetica, and others.
- HypeForFont is a site with 30 completely free fonts to download for any use.
To download new fonts, you can also read the suggestions below:
- you can search for the font used inside an image;
- alternatively we can create a custom writing font with a simple online editor;
We open all the sites and check if the font we were looking for for our documents is present.
3) View all installed fonts
If you want to view the fonts installed on the Windows system, simply open the Start menu, look for the Control Panel app, change the view of the panel by pressing View by -> Small icons at the top right and finally press the Fonts item.
Alternatively, you can see and manage the installed fonts by pressing the Start menu, clicking on the Settings app and finally taking the path Personalization > Fonts.
On the same screen it is possible to install new fonts, if downloaded from other sites and not from the store, by dragging the font file into the dashed box. By clicking on one of the installed fonts, however, it is possible to uninstall and remove it from the computer.
From the same page we can click on the item Get other fonts in the Microsoft Store, so as to download the fonts provided by Microsoft itself. If we don’t like searching far and wide for our new font, we can also settle for those available from the store.
4) Save ink with fonts
If we print many documents every day we can save ink in the printing process by using a cheaper font, one that uses less ink for each character at a microscopic level.
To save ink on Microsoft Word, we advise you to use the Garamond fonts, but the timeless Times New Roman or the Calibri font also defend themselves well.
If possible, avoid fonts like Arial, Verdana, Comic Sans, and Impact unless you have a lot of ink to waste!
Conclusions
Installing and changing fonts is a very simple operation to perform on Windows and, with the right practice, we will be able to quickly change fonts every time we have to print an important document or want to use a cheerful and fun font (especially for making invitations or cards).

